Inbound Call Paths
How to create and manage inbound call paths for your Playbooks organization
Inbound Call Paths
Ensuring prospects have a smooth experience when calling into the sales team is important to both the sales team and the caller. Drag-and-drop Inbound Call Paths enables Playbooks Administrators to configure the route an inbound call takes when it enters the XANT platform.
See the video below for examples and a thorough walk though of how to set up call paths.
Creating Call Paths
The Call Path determines how a call is routed when it reaches the Playbooks system. Call Paths are created in the Playbooks Manager App. You need the Manage Settings Permission to access Call Paths.
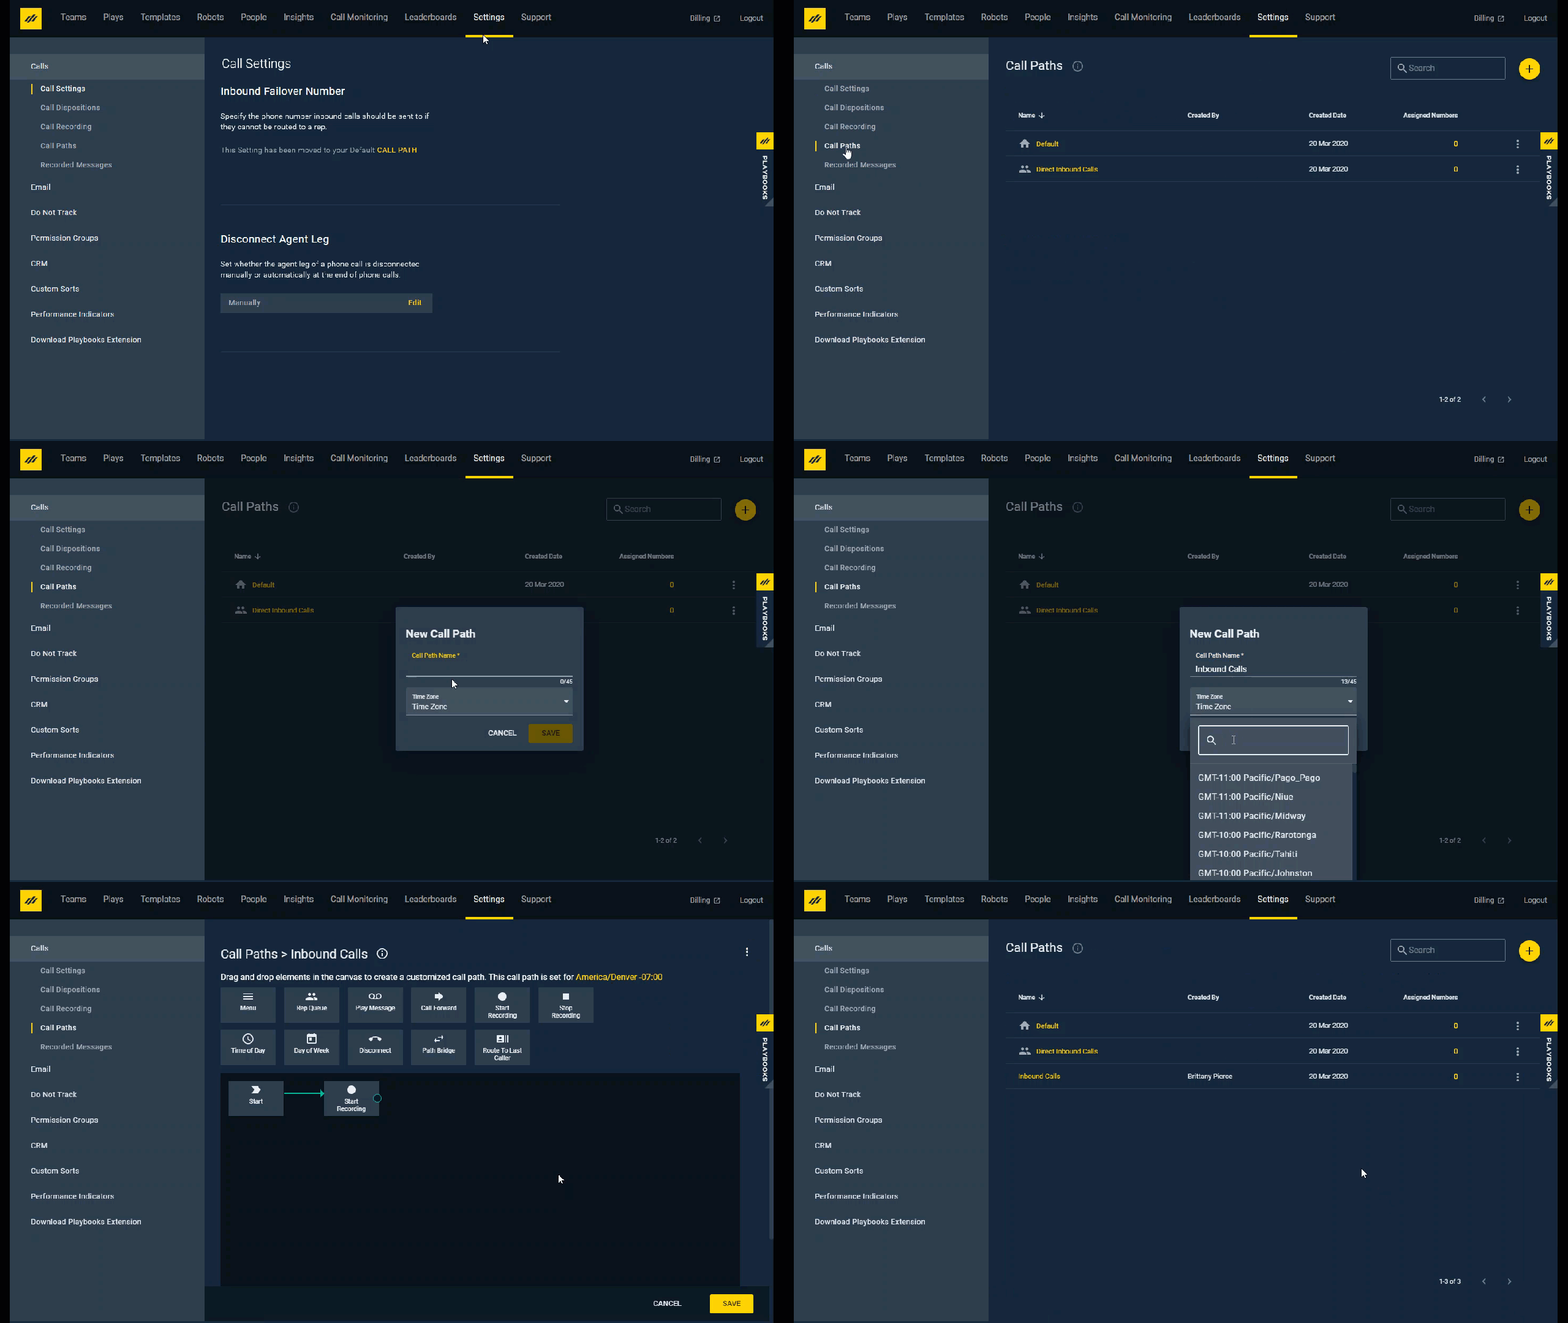
To Create a Call Path
- Open the Playbooks Manager App.
- Click the Settings tab.
- Click Call Paths.
- Click the yellow plus button.
- Name your Call Path and select the time zone.
- Click SAVE.
- Drag, drop, and connect available routing options to customize your call path.
- Double-click each element or click the vertical ellipsis to edit or delete each element.
- End the Call Path with a terminator element (Call Forward, Disconnect, or Path Bridge).
- Click SAVE.
Creating Recorded Messages
Before creating a Call Path, be sure to create the messages that you want prospects to hear when they reach a Call Path. These messaged will be selected in the Menu and Play Message elements when you create and configure your Call Paths. It’s best to have a plan of where these elements will go in your Call Path before you begin recording your messages.
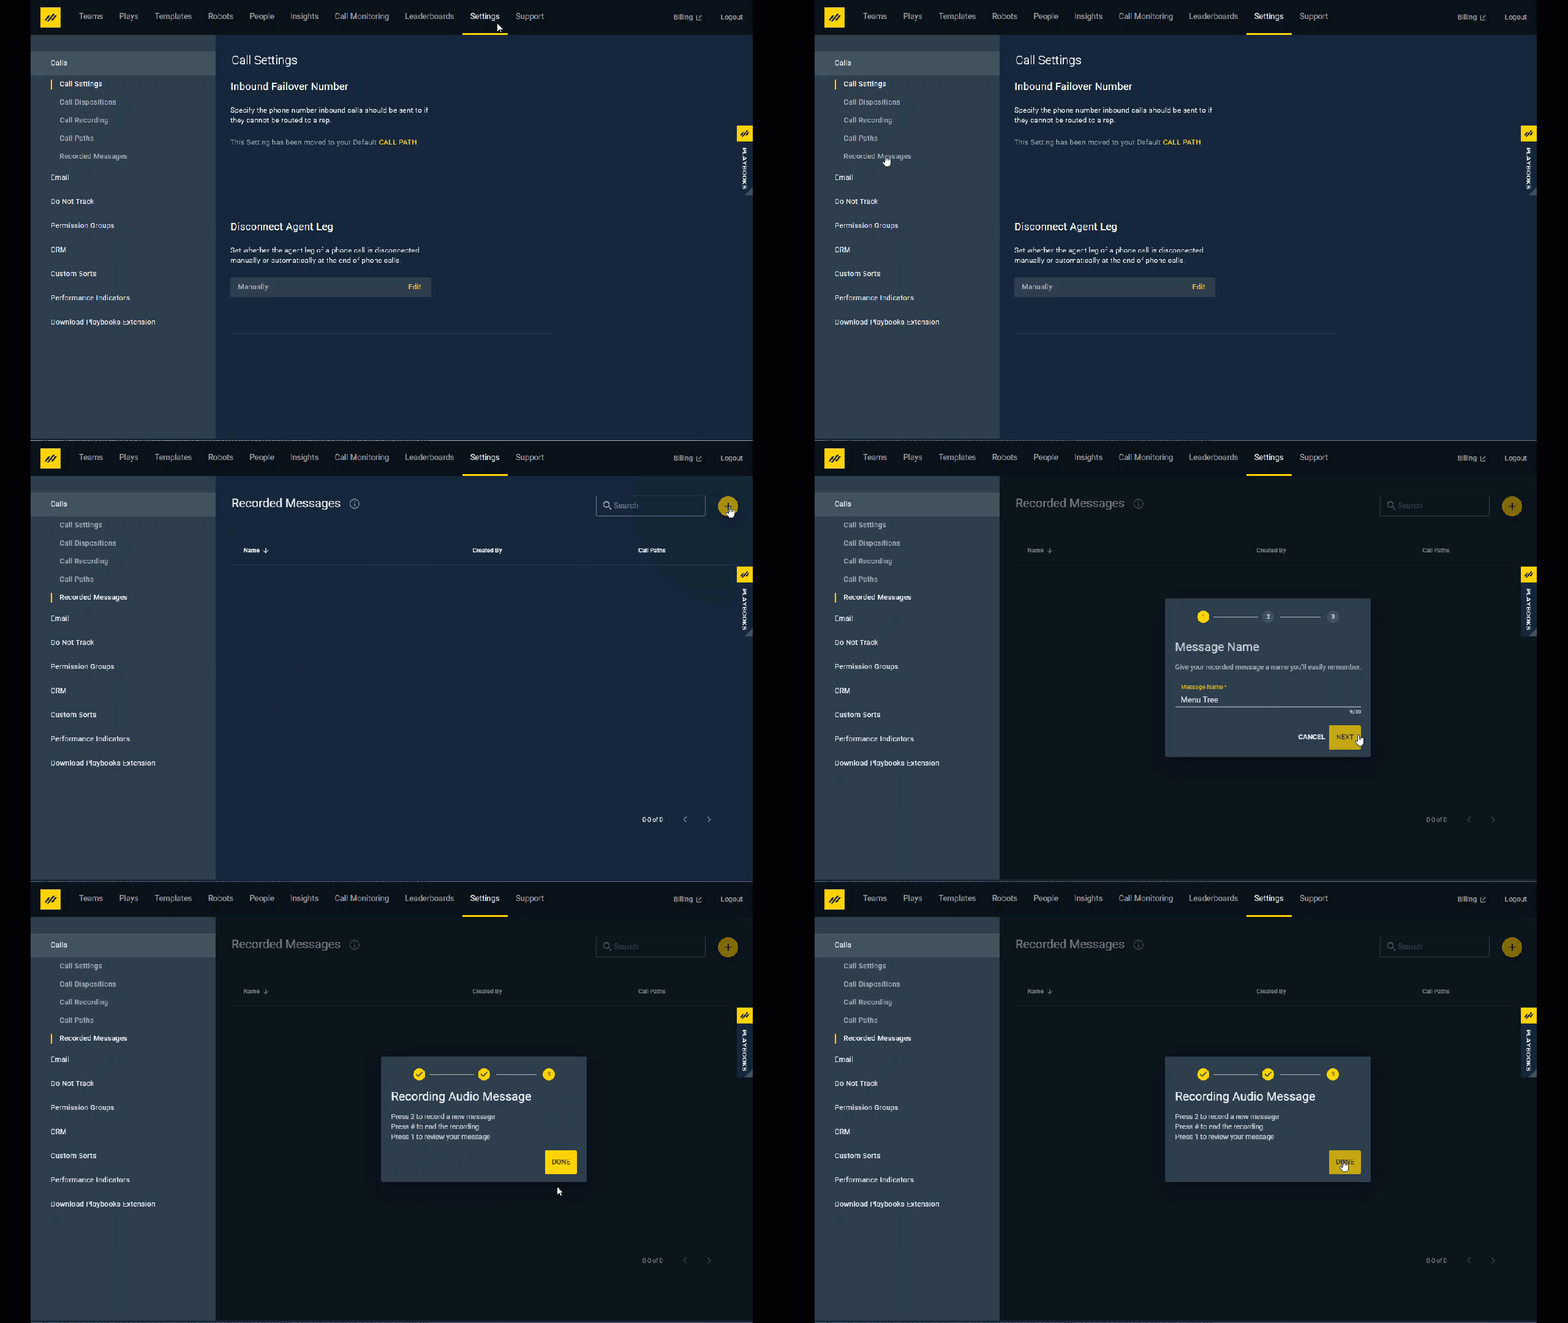
To Create a Recorded Message
- Open the Playbooks Manager Application.
- Click the Settings tab.
- Under Calls, click Recorded Messages.
- Click the yellow plus button.
- Name your new recorded message.
- Click NEXT.
- Verify that you have access to the phone number presented.
- Click CALL ME.
- Use the voice message manager to record and listen to your new message:
Press 2 to record a new message
Press # to end the recording
Press 1 to review your message - Disconnect after a successful recording.
- Click DONE.
Inbound Rep Queues
Administrators can create Rep Queues within Call Paths that will automatically route inbound calls between multiple reps. For example, a company may put a phone number on a website or billboard. When someone calls that number, Playbooks routes that call among the reps one at a time starting with whoever has been waiting the longest to take the call.
Here are some Rep Queue behaviors to be aware of:
- Each rep has a certain amount of time to answer an inbound call. This time is configurable in the Rep Queue element.
- A rep will be marked unavailable if they have missed or ignored four calls in a row. This includes all inbound Playbooks calls, not just calls routed from the Rep Queue.
- The amount of time a call is routed in a queue can be changed for each Rep Queue. This time is configured during Rep Queue setup in the Skip Queue drop-down menu.

Assigning Call Path Number
Once you have created your call path, you must assign an Inbound Number to it before customers will be able to reach it. If you don’t see any available inbound numbers, contact your CSM to get inbound numbers added to your account.
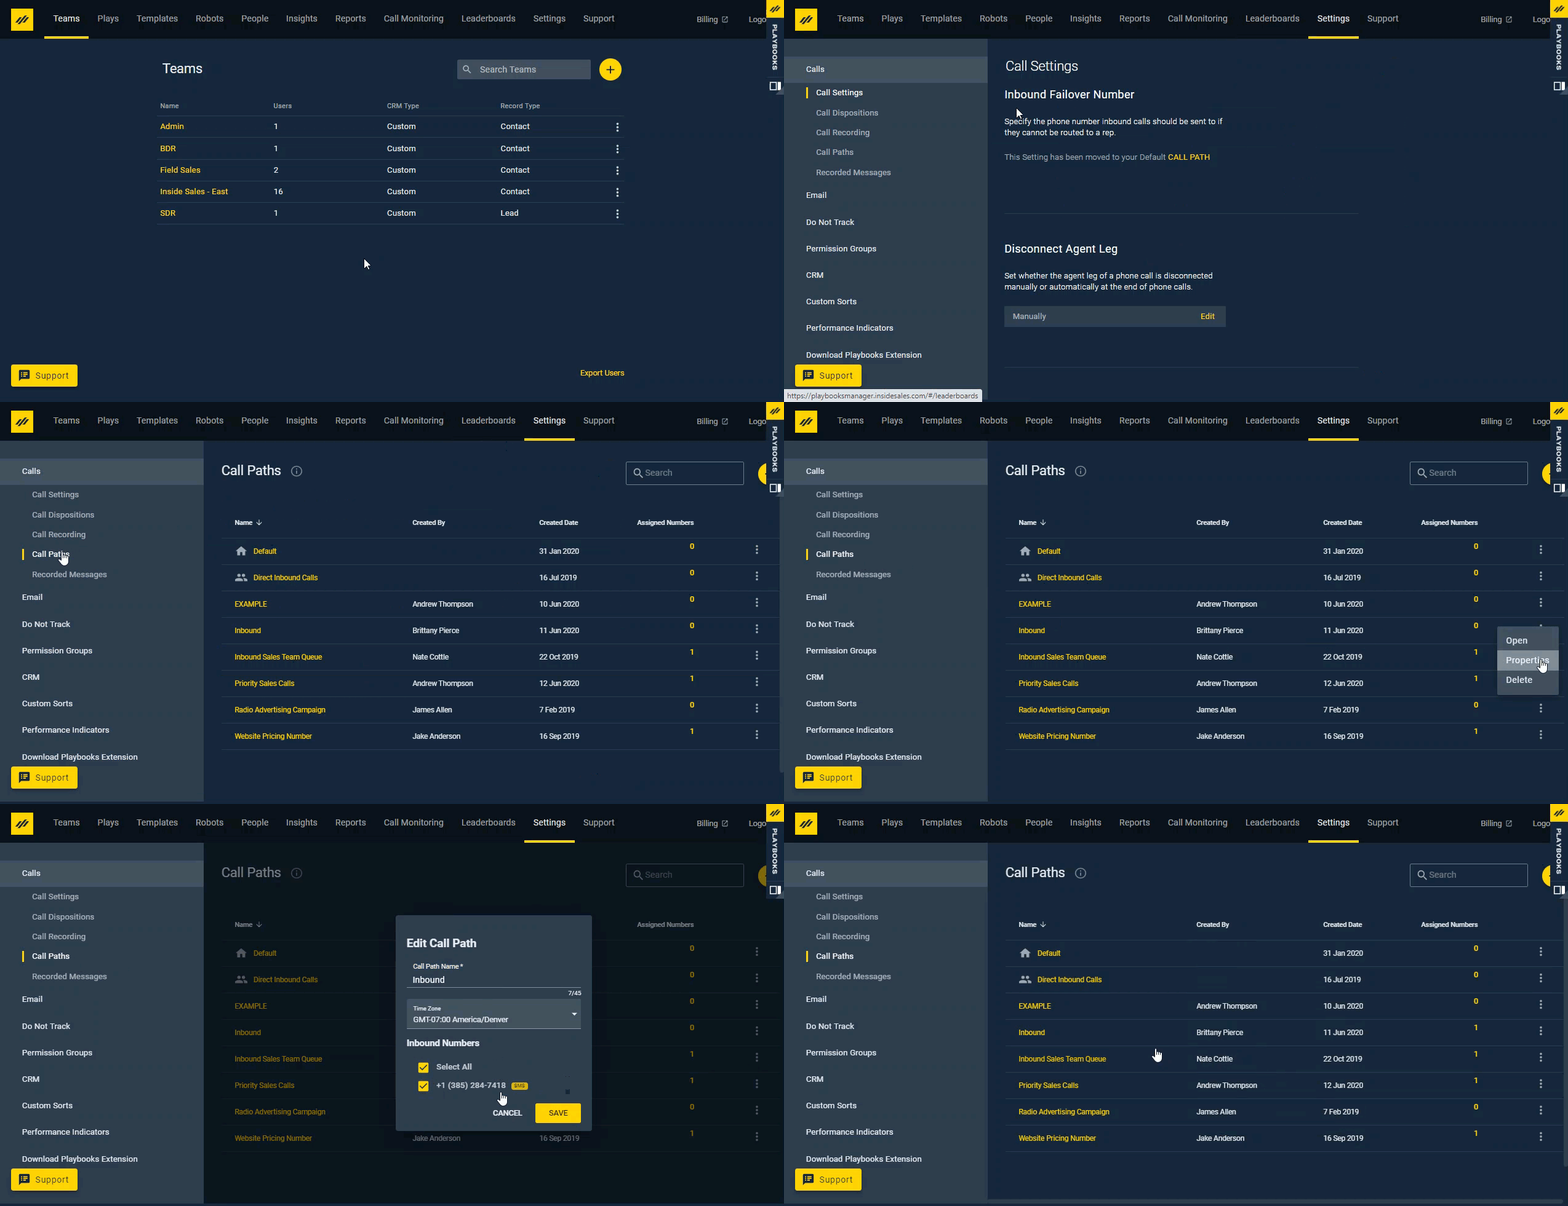
To Assign an Inbound Number to a Call Path
- Open the Playbooks Manager App.
- Click the Settings tab.
- Click Call Paths.
- Click the vertical ellipses next to the Call Path.
- Select Properties.
- Select an available Inbound Number.
- Click Save.
Call Path Considerations
Here are some Inbound Call Path characteristics to think about:
- Call Path name is the name that shows up in reports.
- Time Zone should be set to the time zone of your inbound team or company headquarters.
- Each Call Path branch should end with a terminator element. Terminator elements include Call Forward, Path Bridge, and Disconnect.
- Call Paths should route callers to reps as quickly as possible to keep the abandonment rate low.
Frequently Asked Questions
Q: If you are on an Inbound call, does that change your availability to “Unavailable”?
A: Yes. You cannot be marked as available to accept inbound calls if you are already on an Inbound call.
Q: What happens to your status after you finish an Inbound call?
A: You will be automatically marked as available for Inbound calls after you end the current Inbound call.
Q: Does the Rep Queue indicate if this is a Direct Inbound Number?
A: Yes. The screen-popup will show “Direct Inbound Call” instead of the “Rep Queue [Name]”.


