Manage Teams and Users
How to create teams and manage users in Playbooks
Playbooks simplifies employee management with the convenience of Playbooks Teams. Add new users to Playbooks or make structural changes based on your organization’s needs.
Team Settings and Configuration
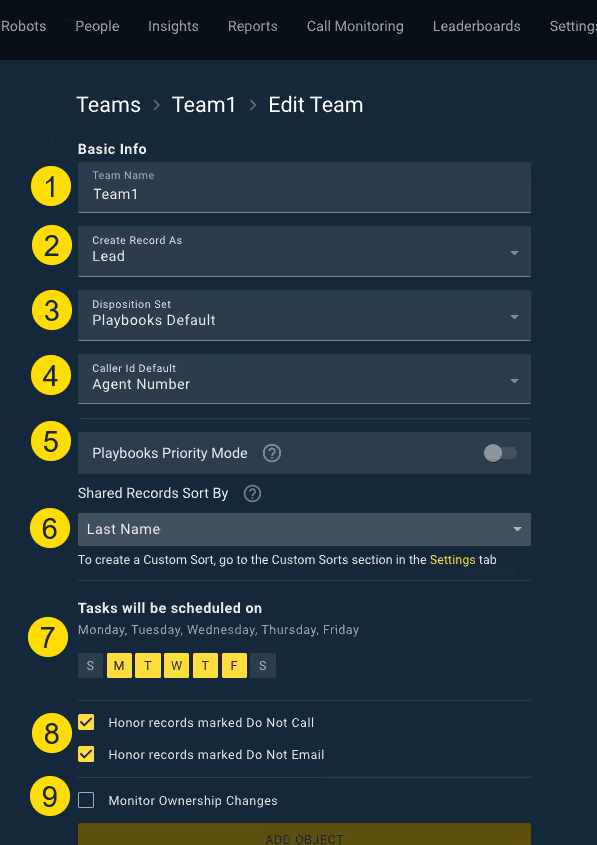
Some settings are best configured for an entire team in order to standardize users. It also requires less strain on Playbooks Administrators to track and manage user configuration. The settings listed below can be found on each Team page and can be designated at setup or edited later.
- Team Name – This is the name you see when adding the teams to Robot and other Playbooks settings.
- Create Record As – This setting will determine what record object will be created when a user selects to create a new record directly from Playbooks. The options are Lead or Contact. Playbooks Administrators should consider each team’s process and sales funnel progression. For example, a Sales Development rep who works with early funnel stage records would create new Leads, while an Account Manager would create contacts.
- Disposition Set – Some teams require unique disposition options. If the default call disposition options will not suit a team, Administrators can setup customized options in the Playbooks Settings and specify the Disposition Set here. Details on creating custom sets can be found in this Help Center Article.
- Caller ID Default – The default Caller ID can be specified for an entire team with this setting. If the user needs a different Caller ID default, that can be updated on the user’s setters and will supersede the team setting. Be sure to set all the proper Caller ID Permissions or the user won’t be have the ability to change this feature.
- Schedule a Team’s Workdays – By default, Playbooks will schedule all tasks due dates for users during the normal business work week (Monday through Friday). Managers can change their team’s scheduled tasks to fall on the days they actually work. For instance, a manager with a team that works over the weekend can update their team’s workdays to include Saturday and Sunday and exclude any weekdays they don’t work. Once a team’s workdays have been set, Playbooks will ignore days the team doesn’t work and schedule tasks for the days they do.
NOTE: Changing a team’s workday schedule will only impact due dates scheduled after the change was made. Tasks created previous to the change will not be updated. - Playbooks Priority Mode –The Playbooks Priority mode streamlines a rep’s user experience in Playbooks giving them access to only the most essential information and a singular workflow. For some teams, this mode encourages less distractions and more efficiency. By default, this feature is turned off.
While reps can’t select which task bucket they work from in this mode, they will still be assigned Urgent, Personal, and Shared tasks (if those have been enabled). Urgent Shared tasks still appear as a notification at the top of the screen and Urgent Personal tasks will automatically be prioritized as the next task the rep works on. Managers can use a custom sort to put all the shared tasks at the top of their rep’s Playbooks. - Share Records Sorting – This field selects which Custom Sort is used to sort the Shared Records as they are distributed to reps. If nothing has been selected for this field, records will be distributed alphabetically.
- Do Not Call/Email Records – Check these boxes to honor CRM records marked as Do Not Call and Do Not Email, Playbooks will not allow team members to call and email these CRM records. The setting is specifically querying the standard CRM checkbox fields. Custom ‘No Contact’ fields will not be queried and observed.
- Monitor Ownership Changes – Removes a record from your agent’s instance of Playbooks if they are no longer the owner of that record. More information on this setting is provided in the next section.
Monitor Ownership Changes Checkbox Explained
Configuring Playbooks to monitor ownership changes sets a trigger to remove a record from your agent’s instance of Playbooks if they are no longer the owner of that record. This ownership is based on any look up ID Field on the standard Playbooks Objects. You can monitor ownership of one or multiple Playbooks Objects.
For example, if you want a BDR to only have access to a Contact when they own the record, you can enable Monitor Ownership Changes for Object: Contact and CRM Ownership: Owner ID.
To Set Monitor Ownership Changes
- Click the Monitor Ownership Changes checkbox.
- Add the Object and CRM Ownership user lookup field.
- Optionally, click ADD OBJECT to add more ownership fields.
NOTE: You can add as many ownership fields as you have Playbooks objects. - Click Save.
Creating a Team
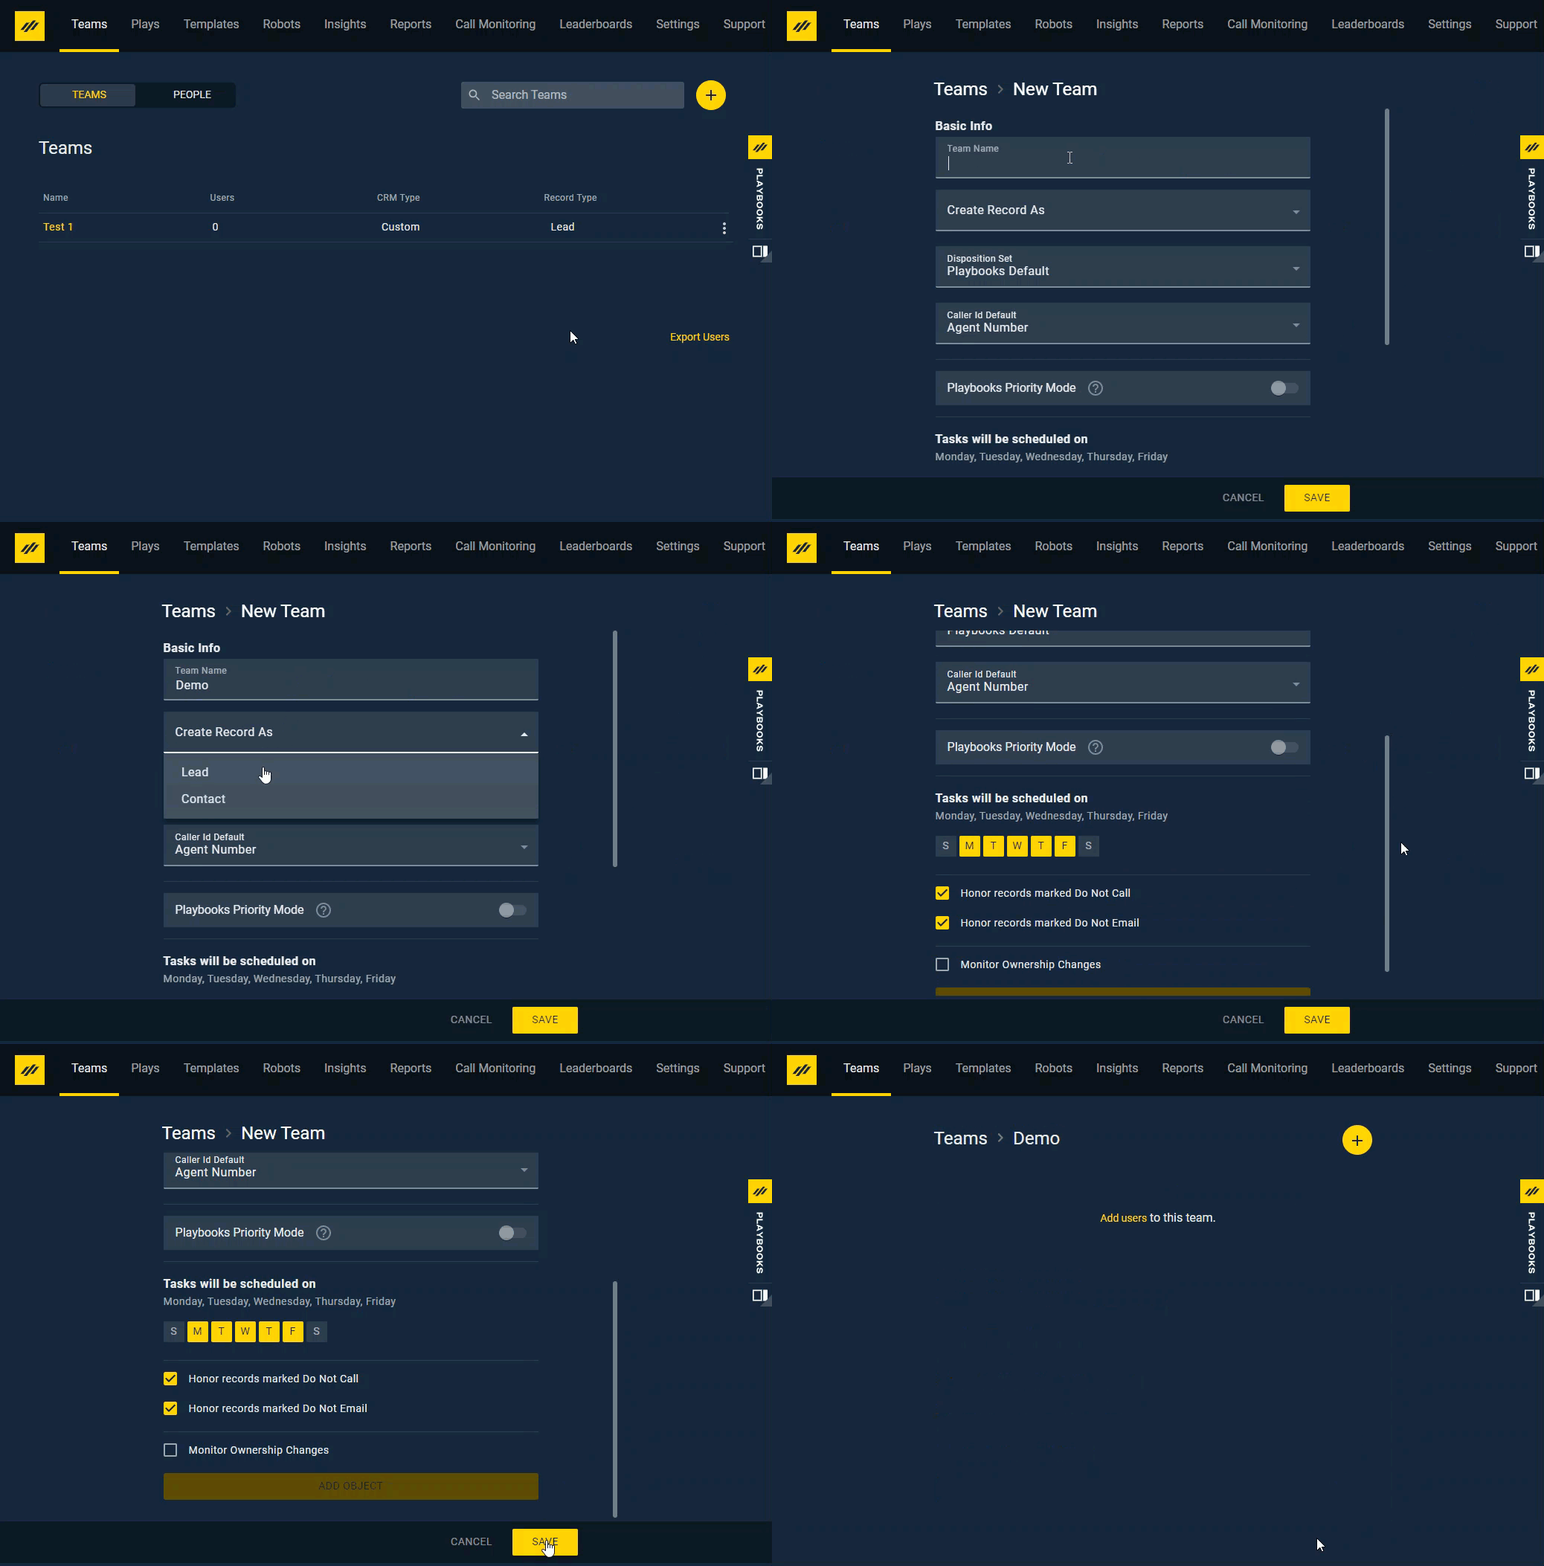
Create specific teams that unify agents with a distinct initiative. Add as many teams as your structure requires.
To Create a Team
- Open the Playbooks Manager Application.
- Click the Teams tab.
- Click the yellow plus or Create a Team button.
- Click Create New.
- Name your team.
- Optionally, map your team to an existing CRM team.
- Select Lead or Contact for the Create Record As dropdown.
- Select the Disposition Set.
- Select Caller Id Default.
- Optionally, enabled Playbooks Priority Mode.
- Optionally, select the sorting method for Shared Records.
- Check or uncheck the Honor records marked Do Not Call box.
- Check or uncheck the Honor records marked Do Not Email box.
- Optionally, Check or uncheck the Monitor Ownership Changes box.
- Click SAVE.
Editing a Team
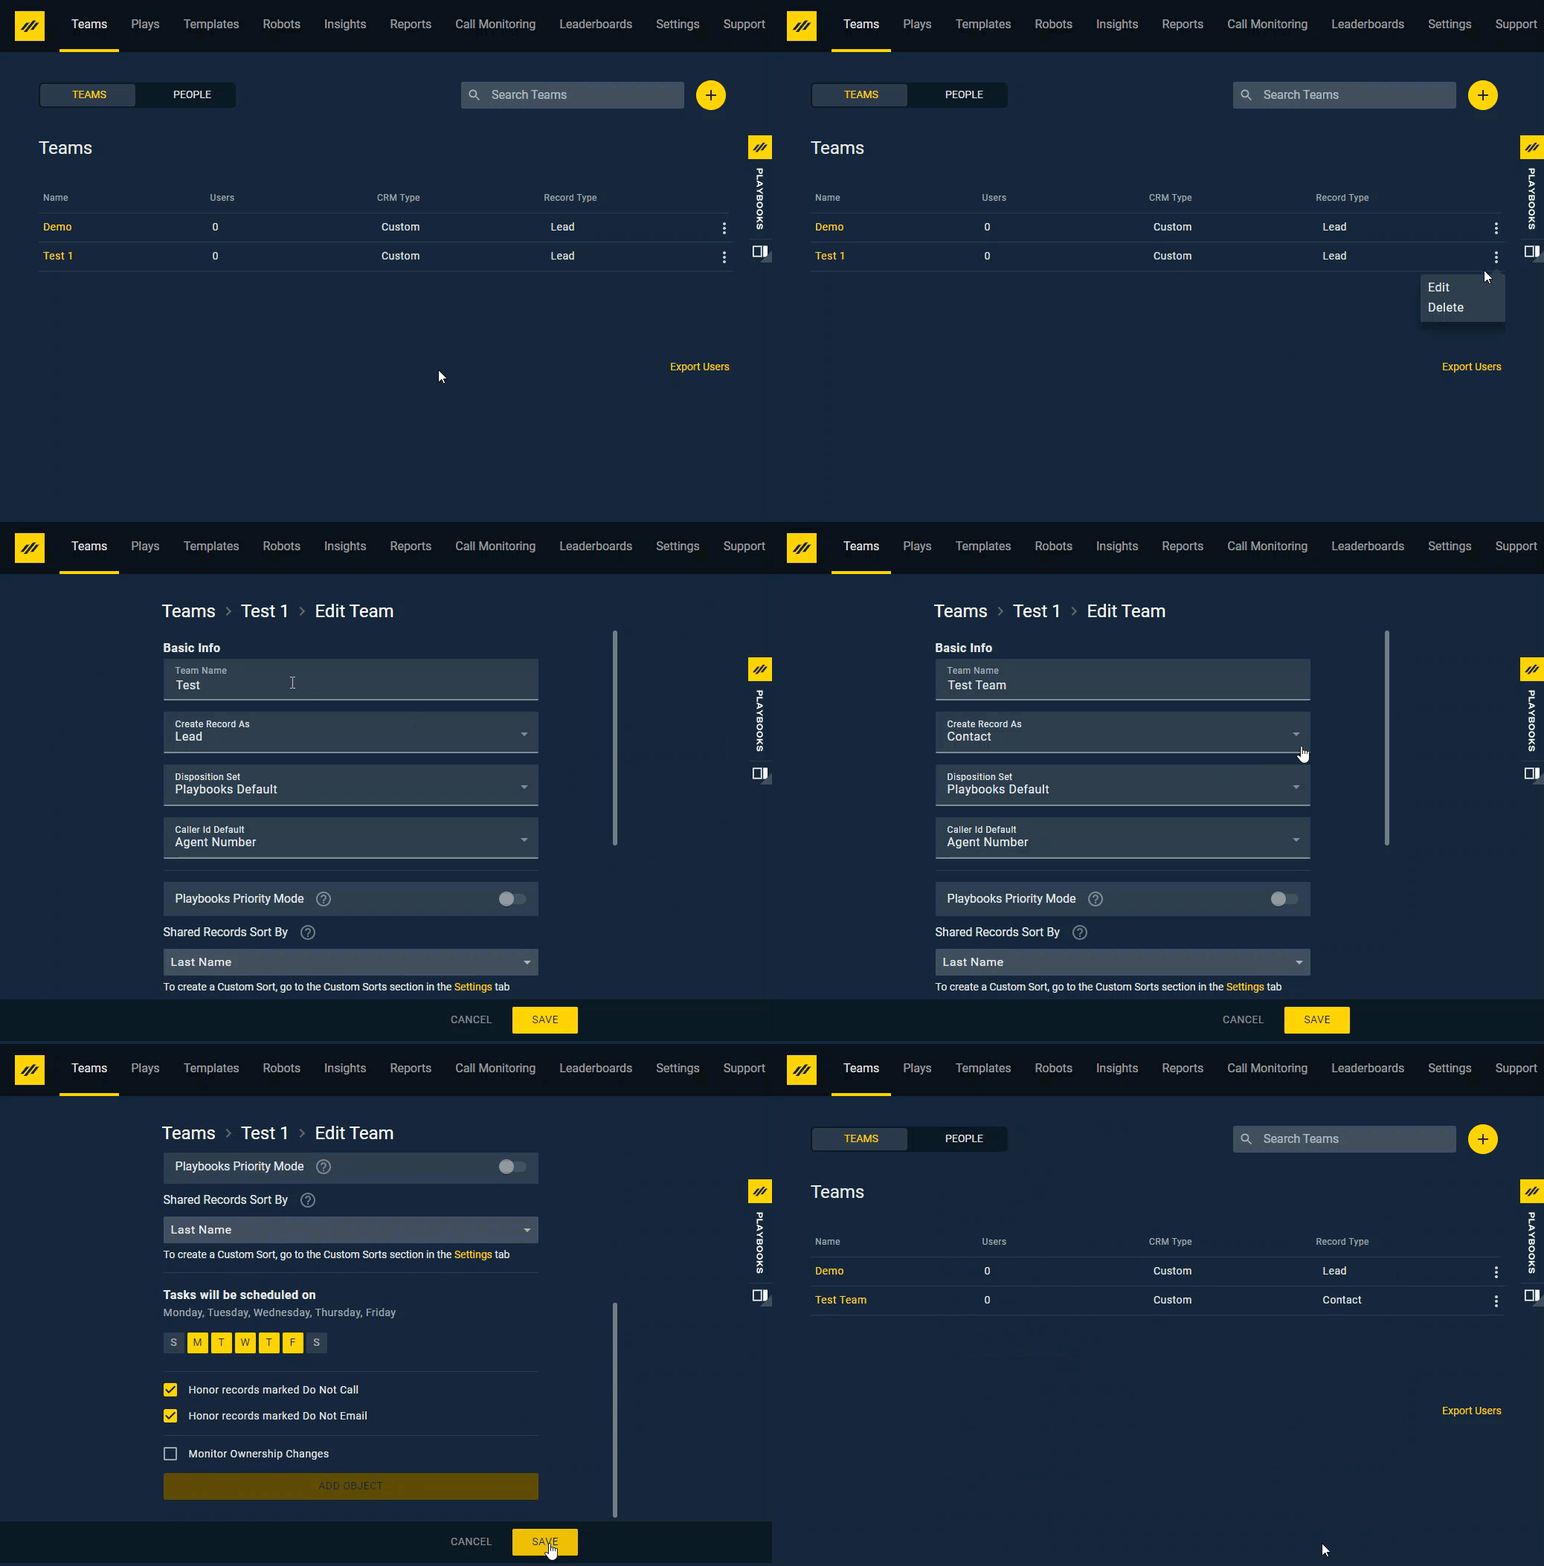
Occasionally the directive of a team may change, but the people in the group remain the same. Instead of moving all existing agents into a new group, edit the Team directly.
To Edit a Team
- Open the Playbooks Manager Application.
- Click the Teams tab.
- Click the vertical ellipsis to the right of the Team name.
- Click Edit.
- Make changes to Team settings and configurations.
- Click SAVE.
Removing a User from a Team
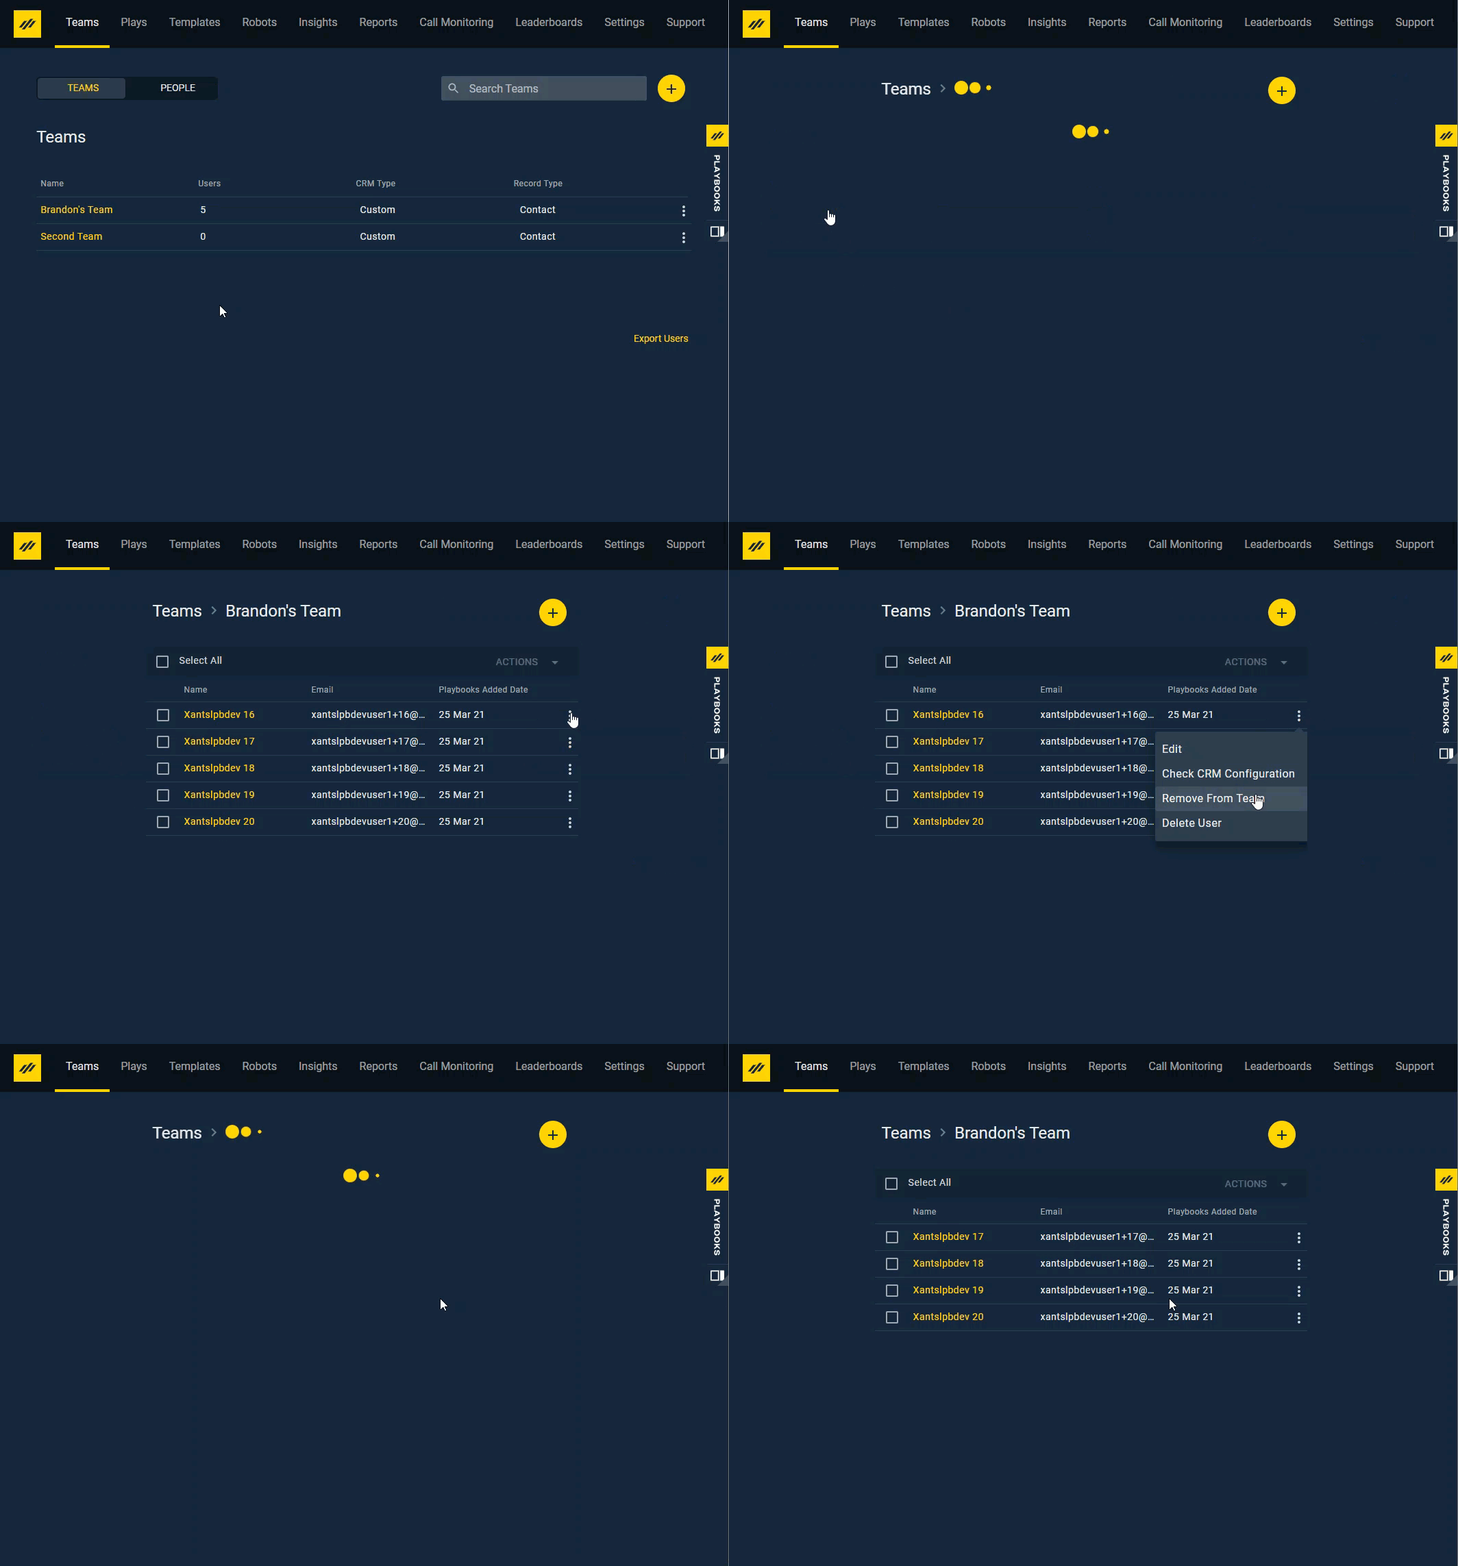
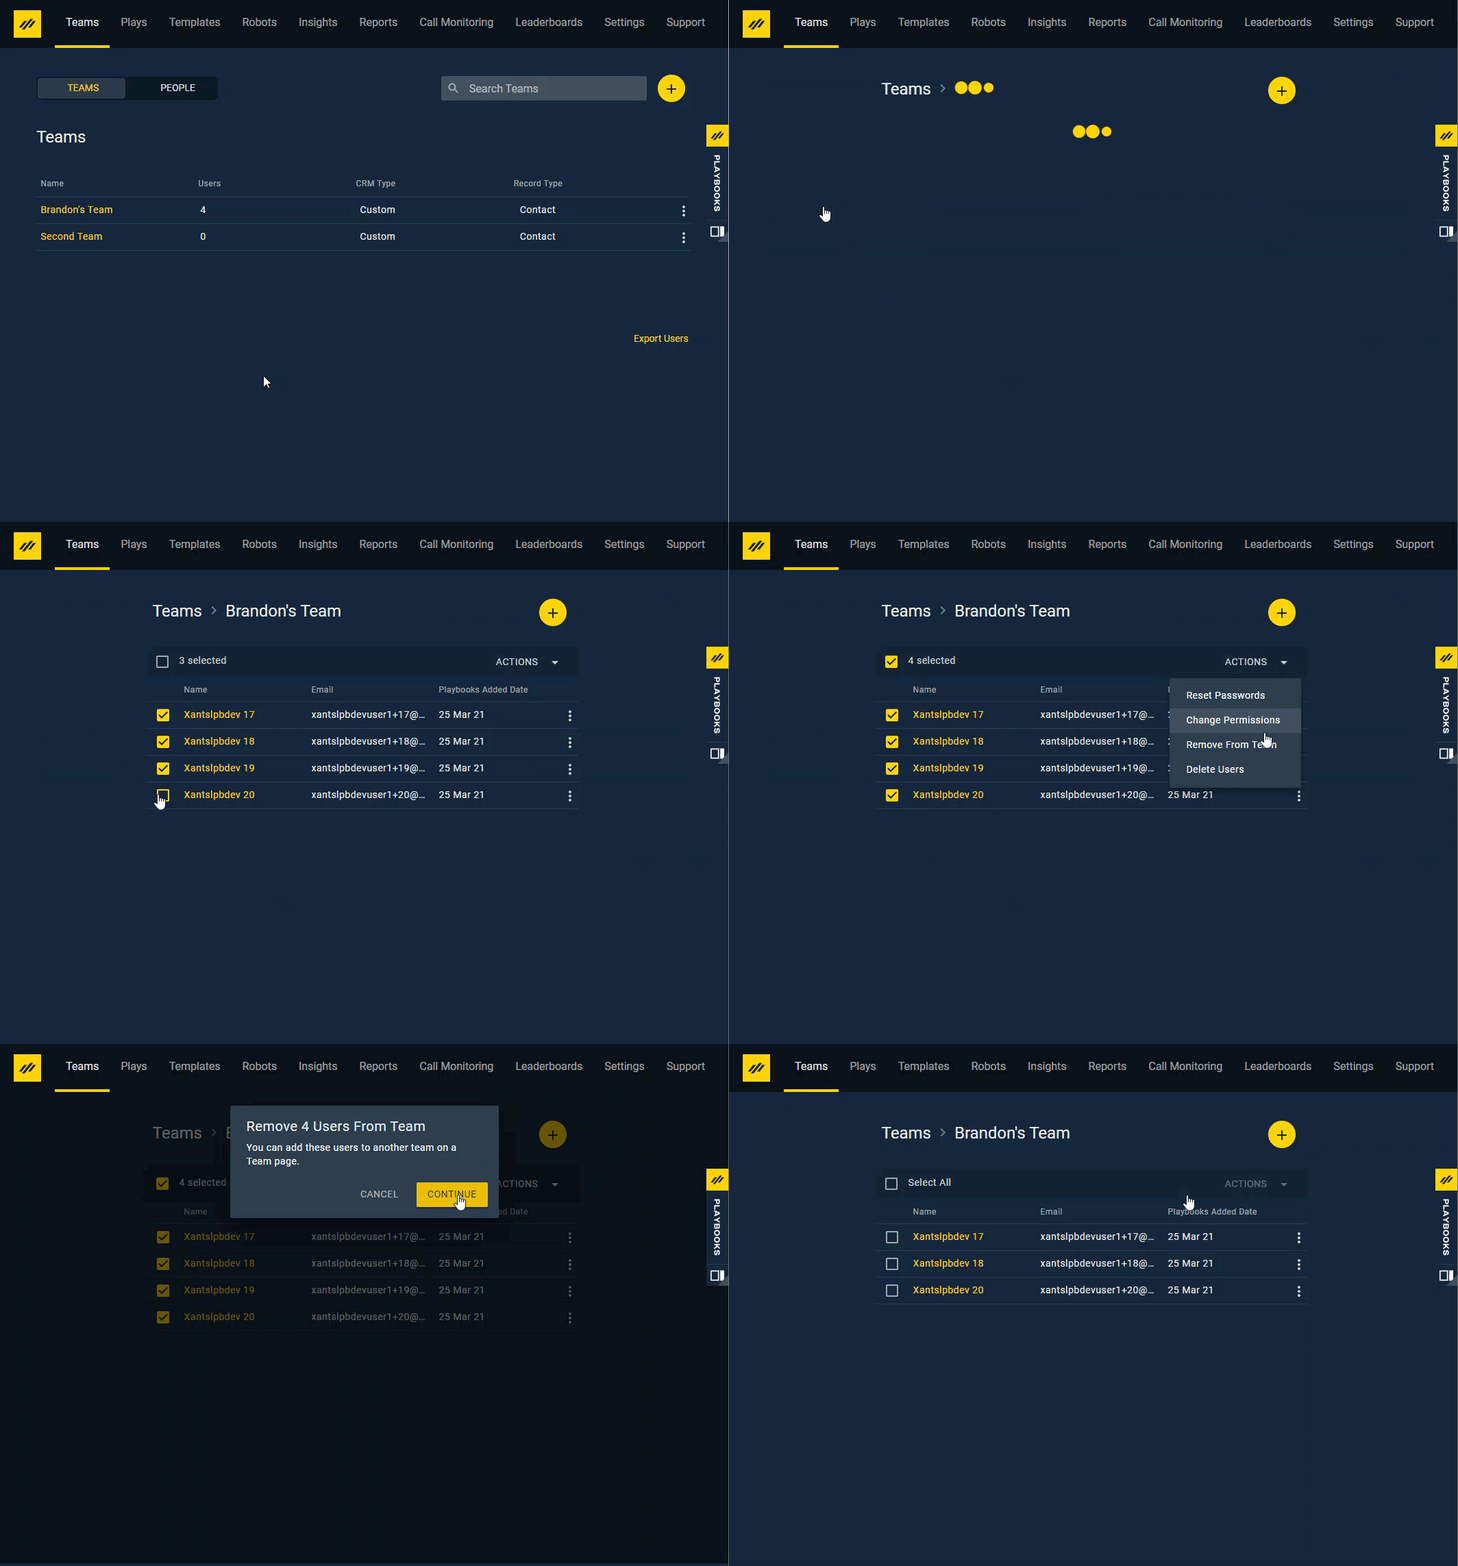
You can remove users from a Team. Removing a user from a team doesn’t delete then from Playbooks.
To Remove a User from a Team
- Open the Playbooks Manager Application.
- Click the Teams tabs.
- Click a Team name.
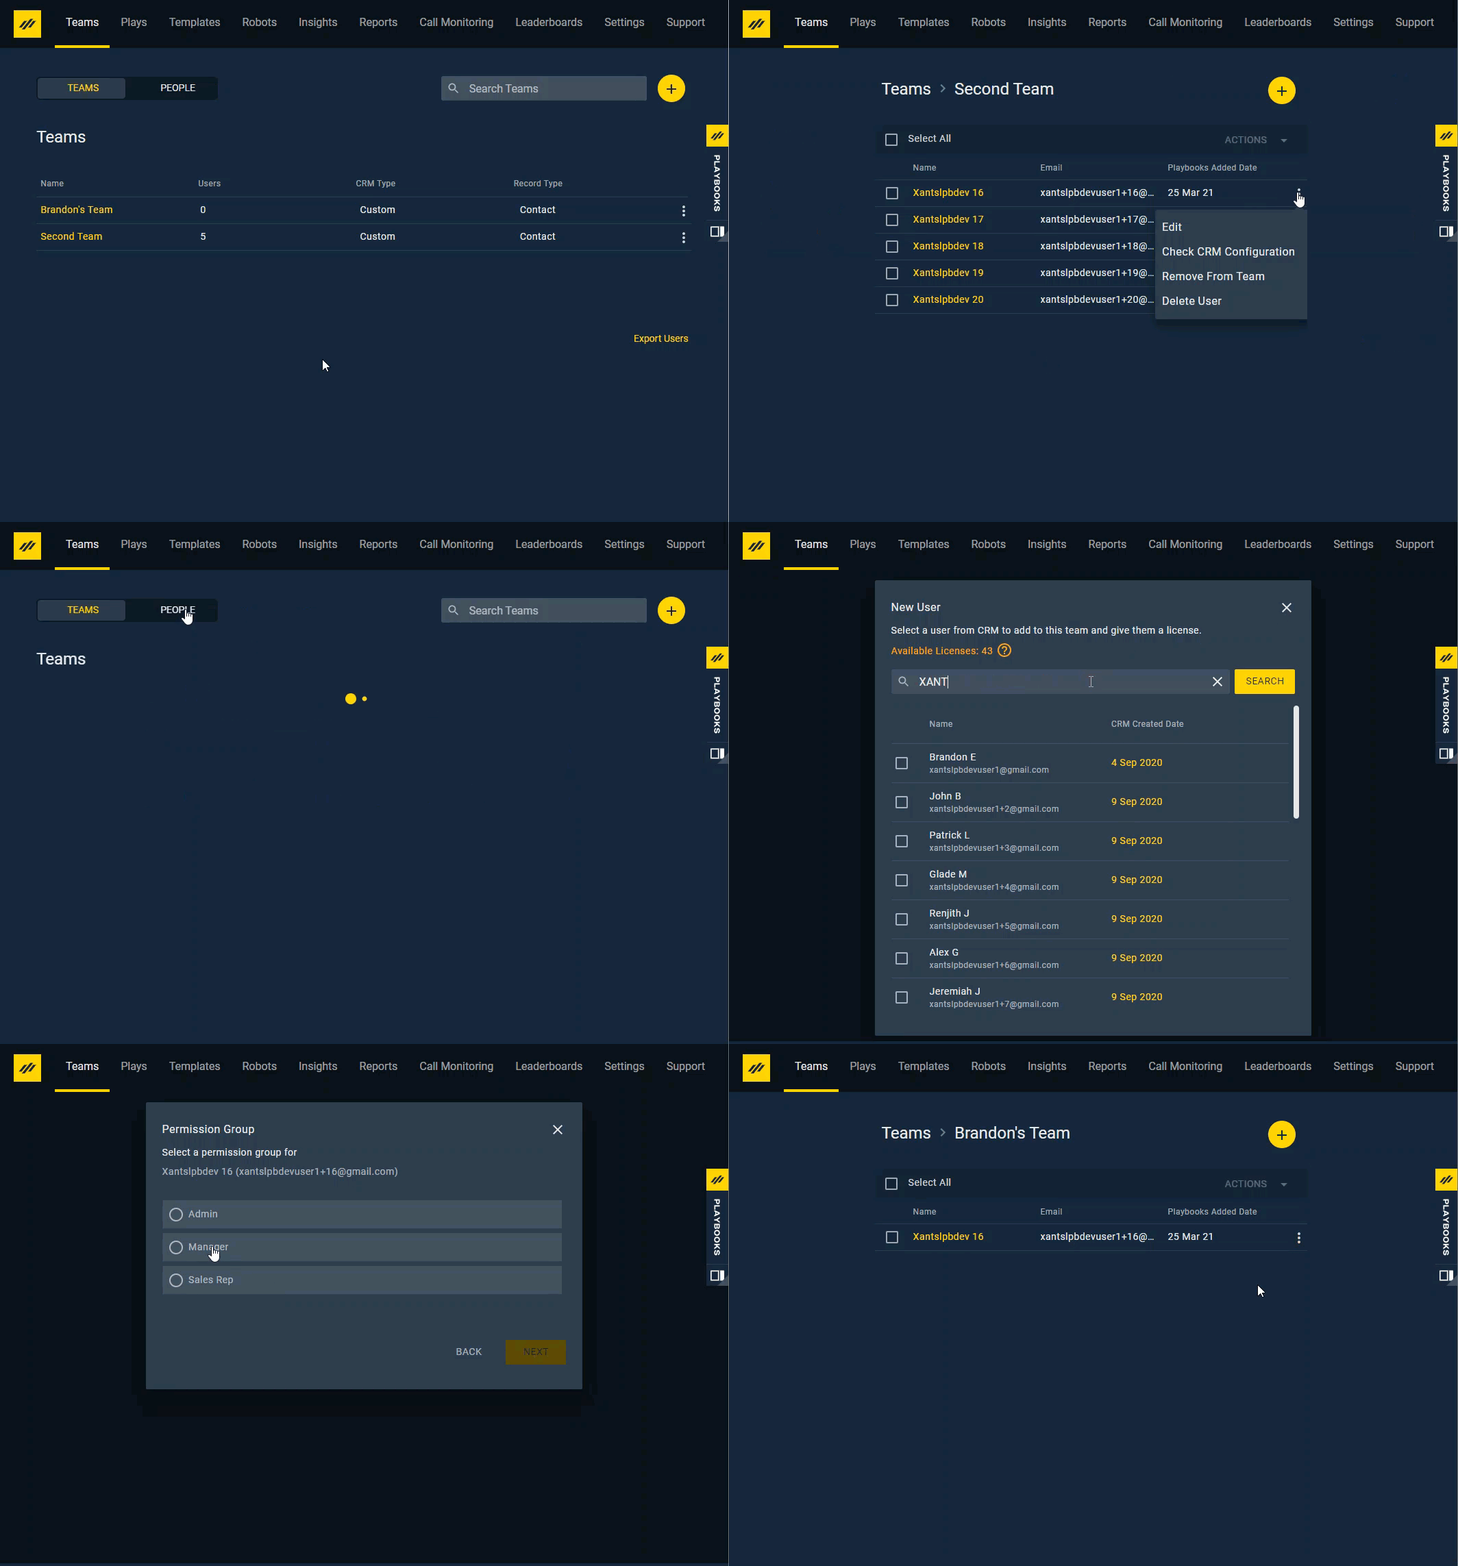
- Click the vertical ellipsis to the right of the user’s name.
- Select Remove From Team.
- Click CONTINUE.
Deleting a Team
Changes in your organization will sometimes present the need to delete an entire Team. Keep your Playbooks hierarchy on the same page as your company by deleting old or unused Teams.
Adding a User
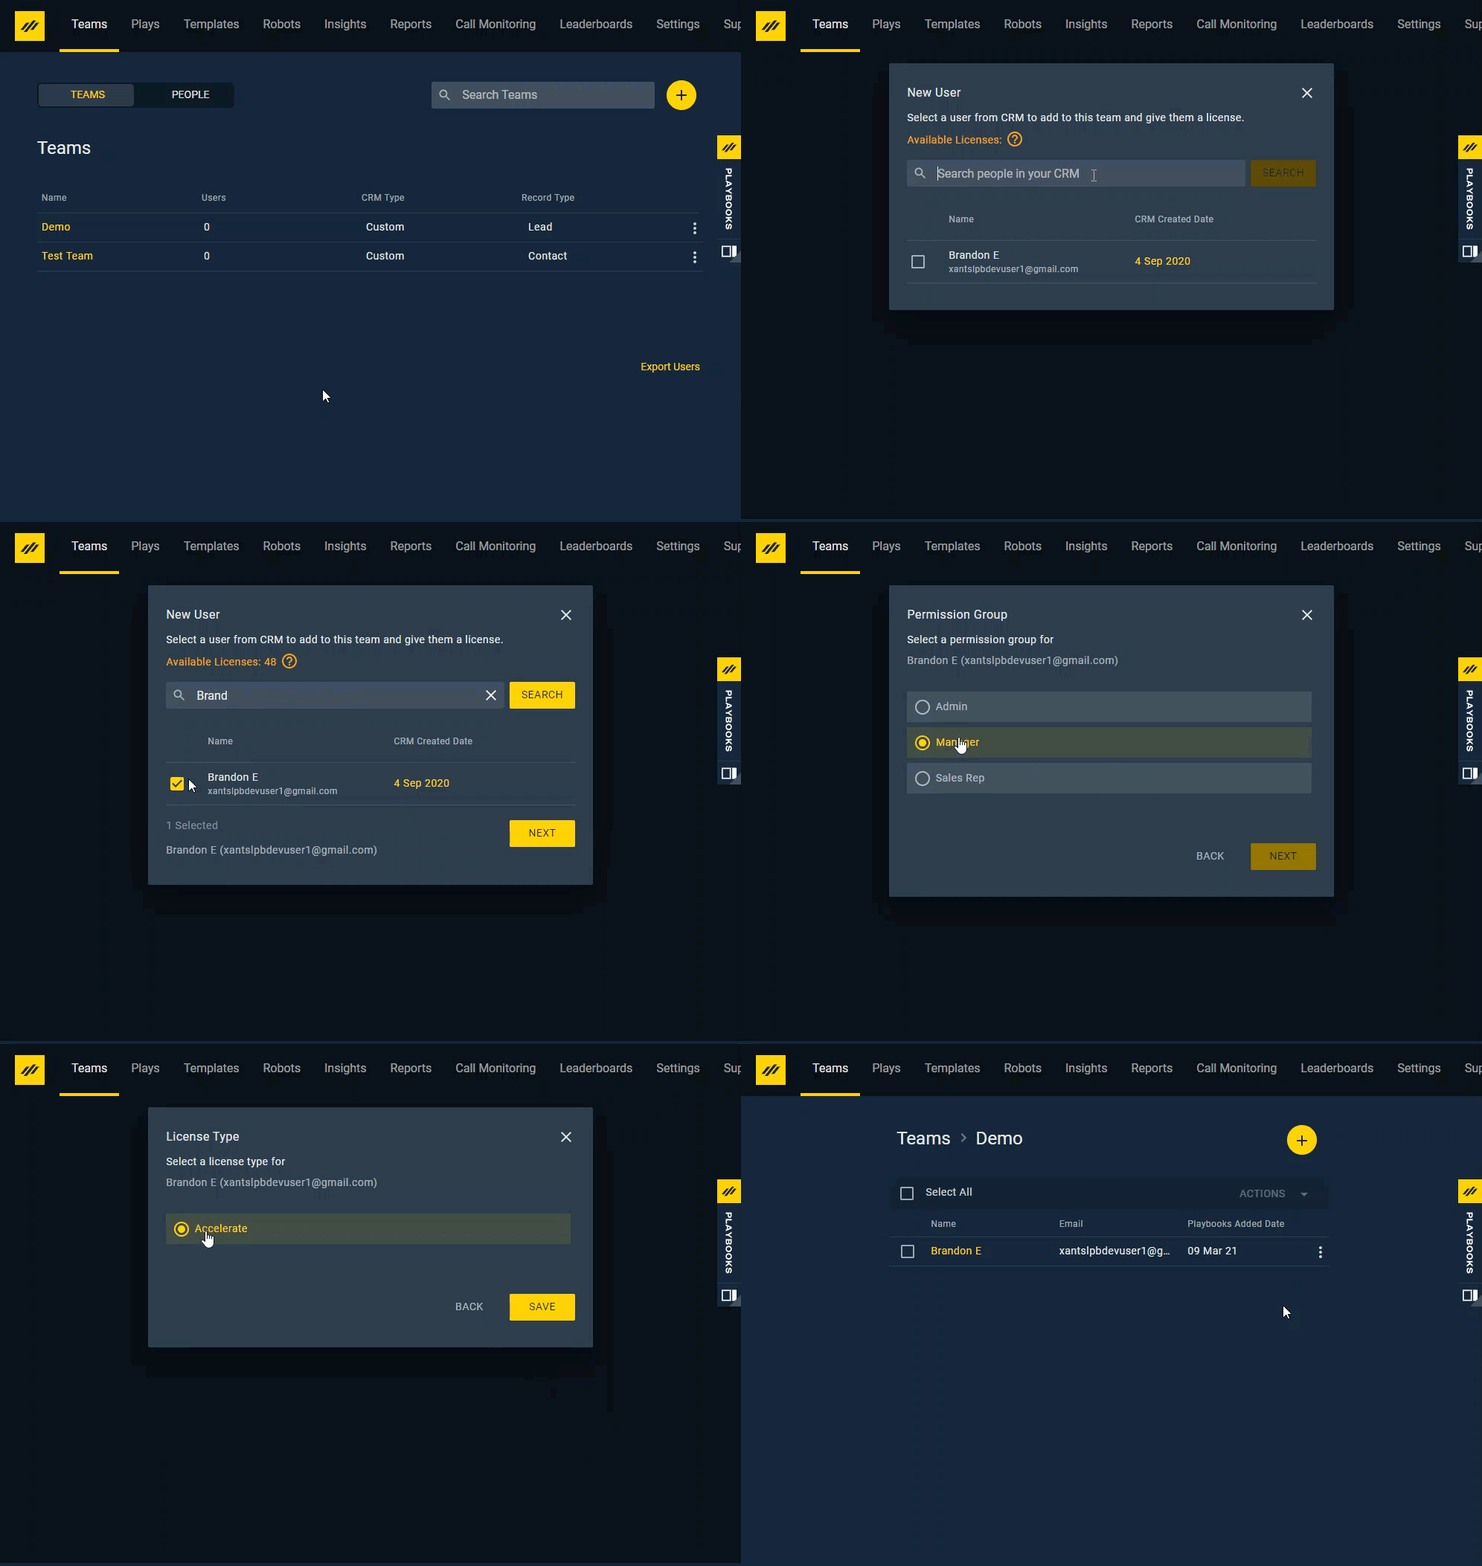
In the Playbooks Manager Application, users can be accessed from the Teams page as well as the People page. The Teams tab allows you to add users to your team directly from your CRM. A user must exist in your CRM hierarchy before you can add them to your team. Saving a member to your team will automatically send an email invitation for that user to join Playbooks.
To Add a User
- Open the Playbooks Manager Application.
- Click the Teams tab.
- Click a Team name.
- Click the yellow plus or Add users button.
- Type the appropriate search terms for the users you want to add.
- Click Search.
- Check the box next to users that you would like to add.
- Click NEXT.
- Select a Permission Group for the users.
- Click NEXT.
- Select the License Type for the users.
- Click SAVE.
Editing a User
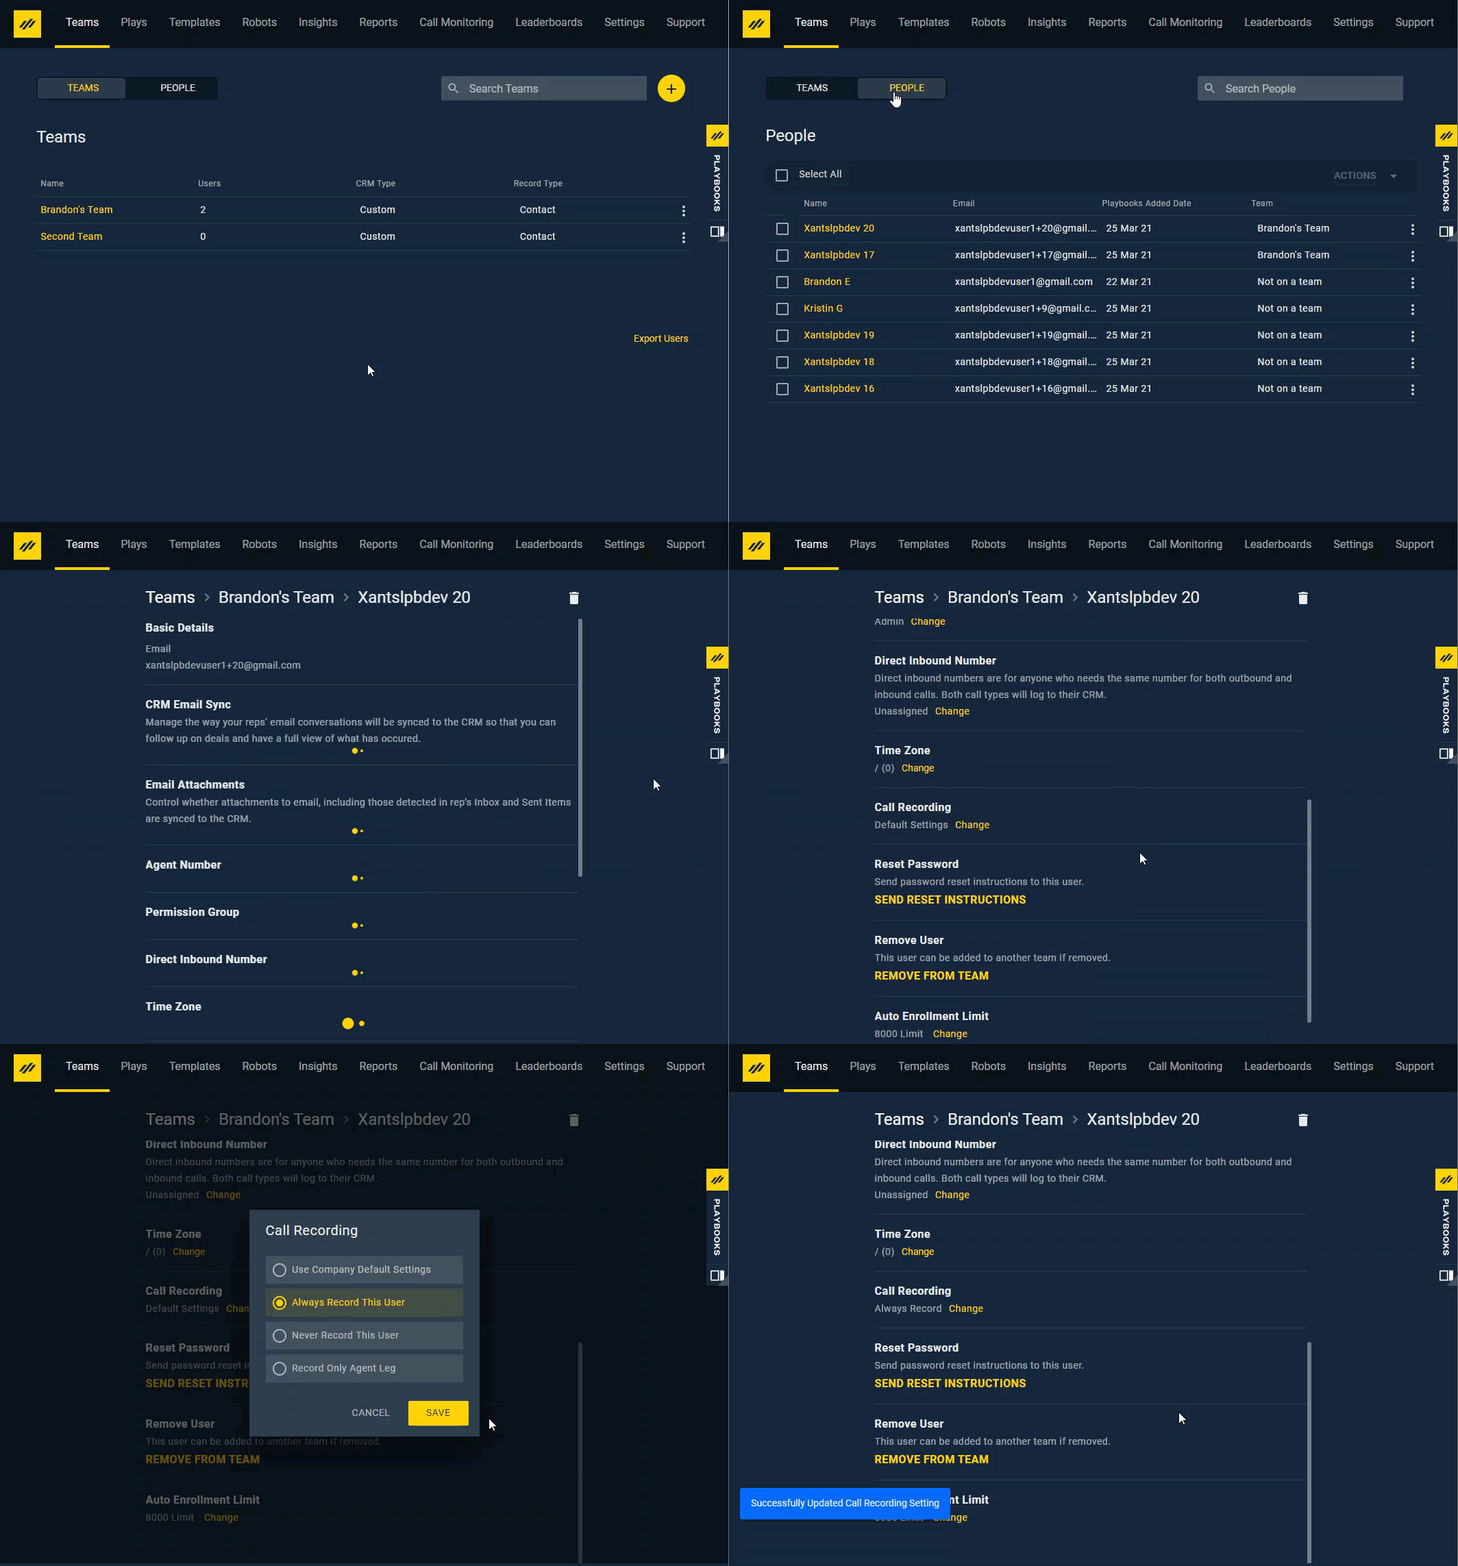
Update a user’s basic attributes, such as phone numbers, permissions, or call recording settings from both the Teams page and the People Page. You can send a password reset to users or even remove them from their current team.
To Edit a User from Teams Page
- Open the Playbooks Manager Application.
- Click the Teams tab.
- Click a Team name.
- Click the vertical ellipsis to the right of the agent’s name.
- Click Edit.
- Optionally, make any changes to any of the available attributes.
- Optionally, reset a password by clicking SEND RESET INSTRUCTIONS.
- Optionally, remove a user from a Team by clicking REMOVE FROM TEAM.
To Edit a User from People Page
- Open the Playbooks Manager Application.
- Click the Teams tab.
- Click PEOPLE.
- Click the vertical ellipsis to the right of the agent’s name.
- Click Edit.
- Optionally, make any changes to any of the available attributes.
- Optionally, reset a password by clicking SEND RESET INSTRUCTIONS.
- Optionally, remove a user from a Team by clicking REMOVE FROM TEAM.
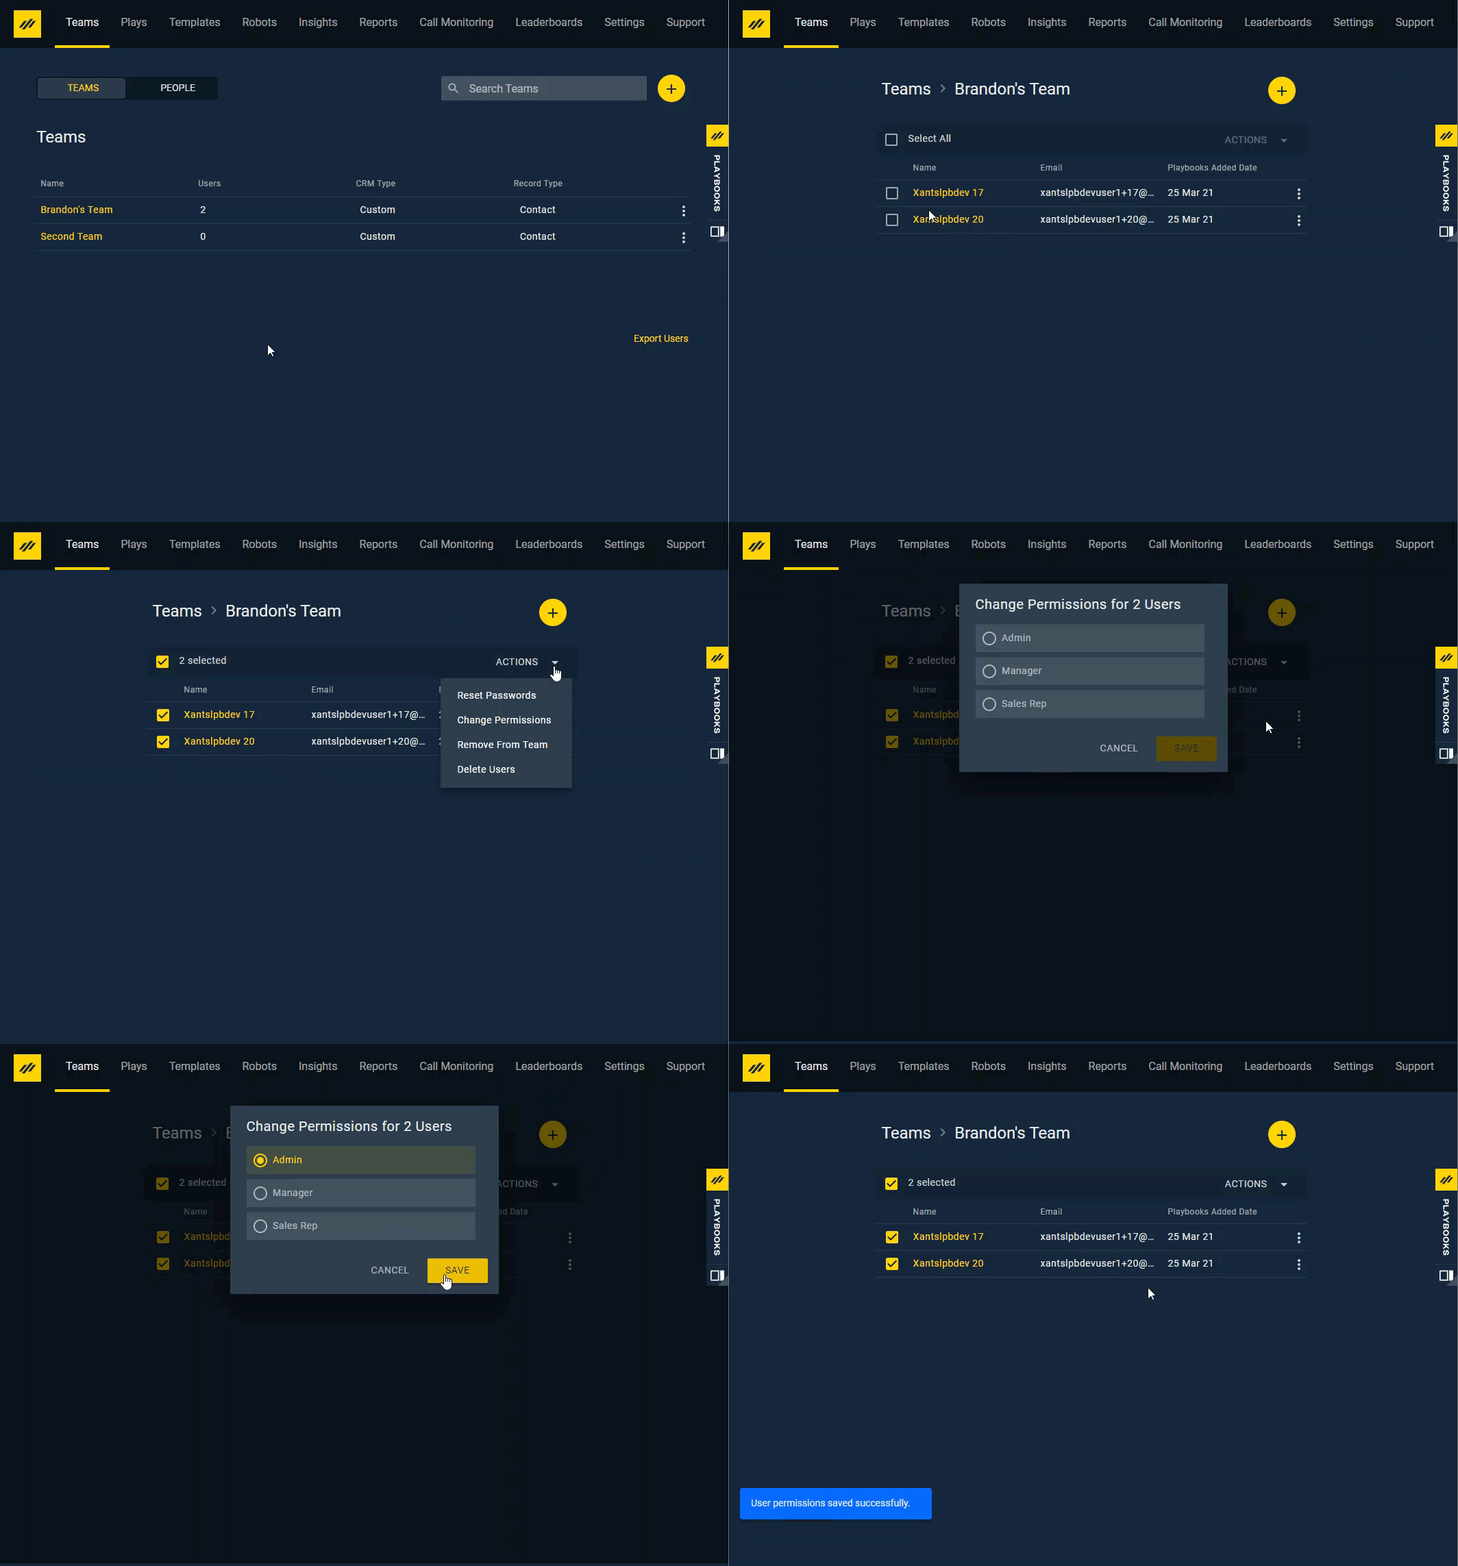
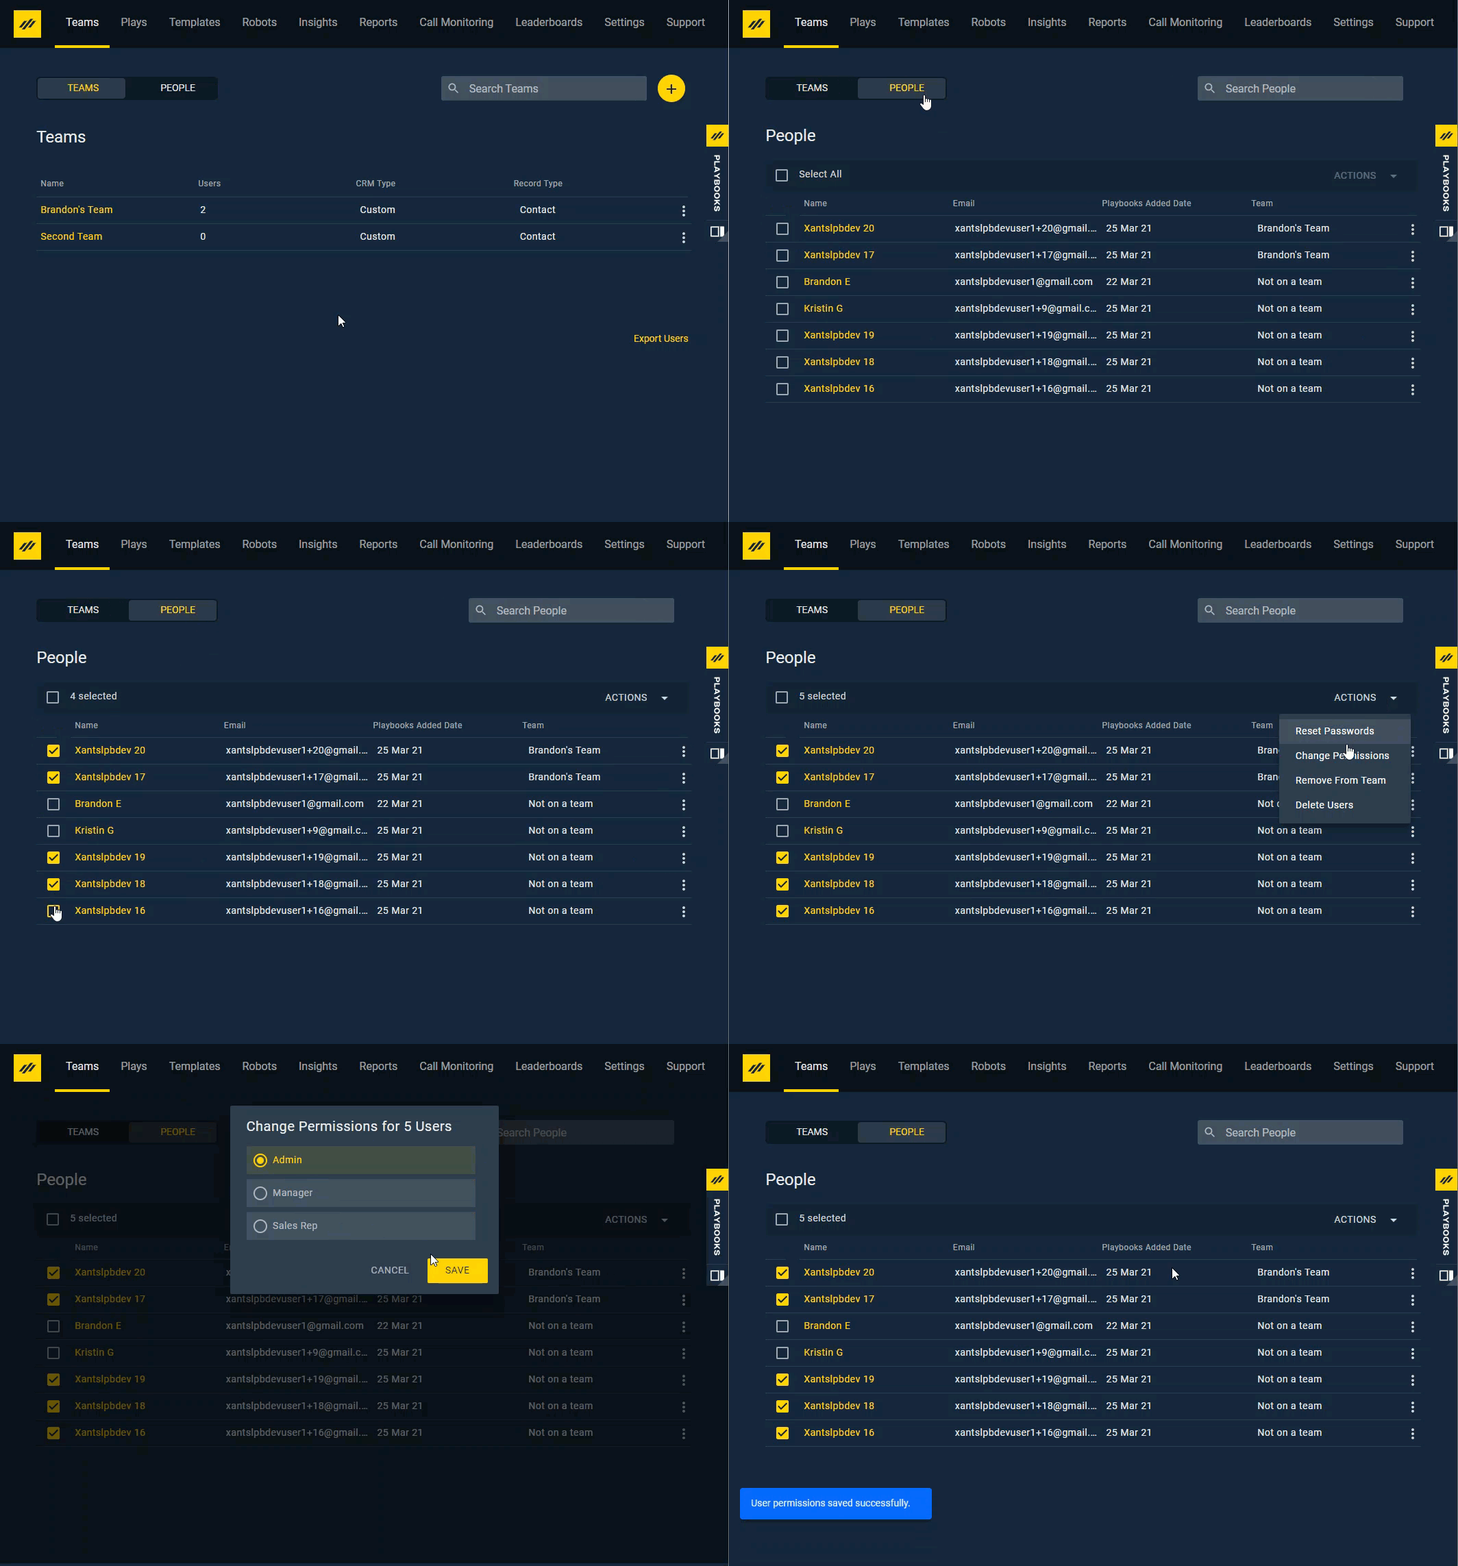
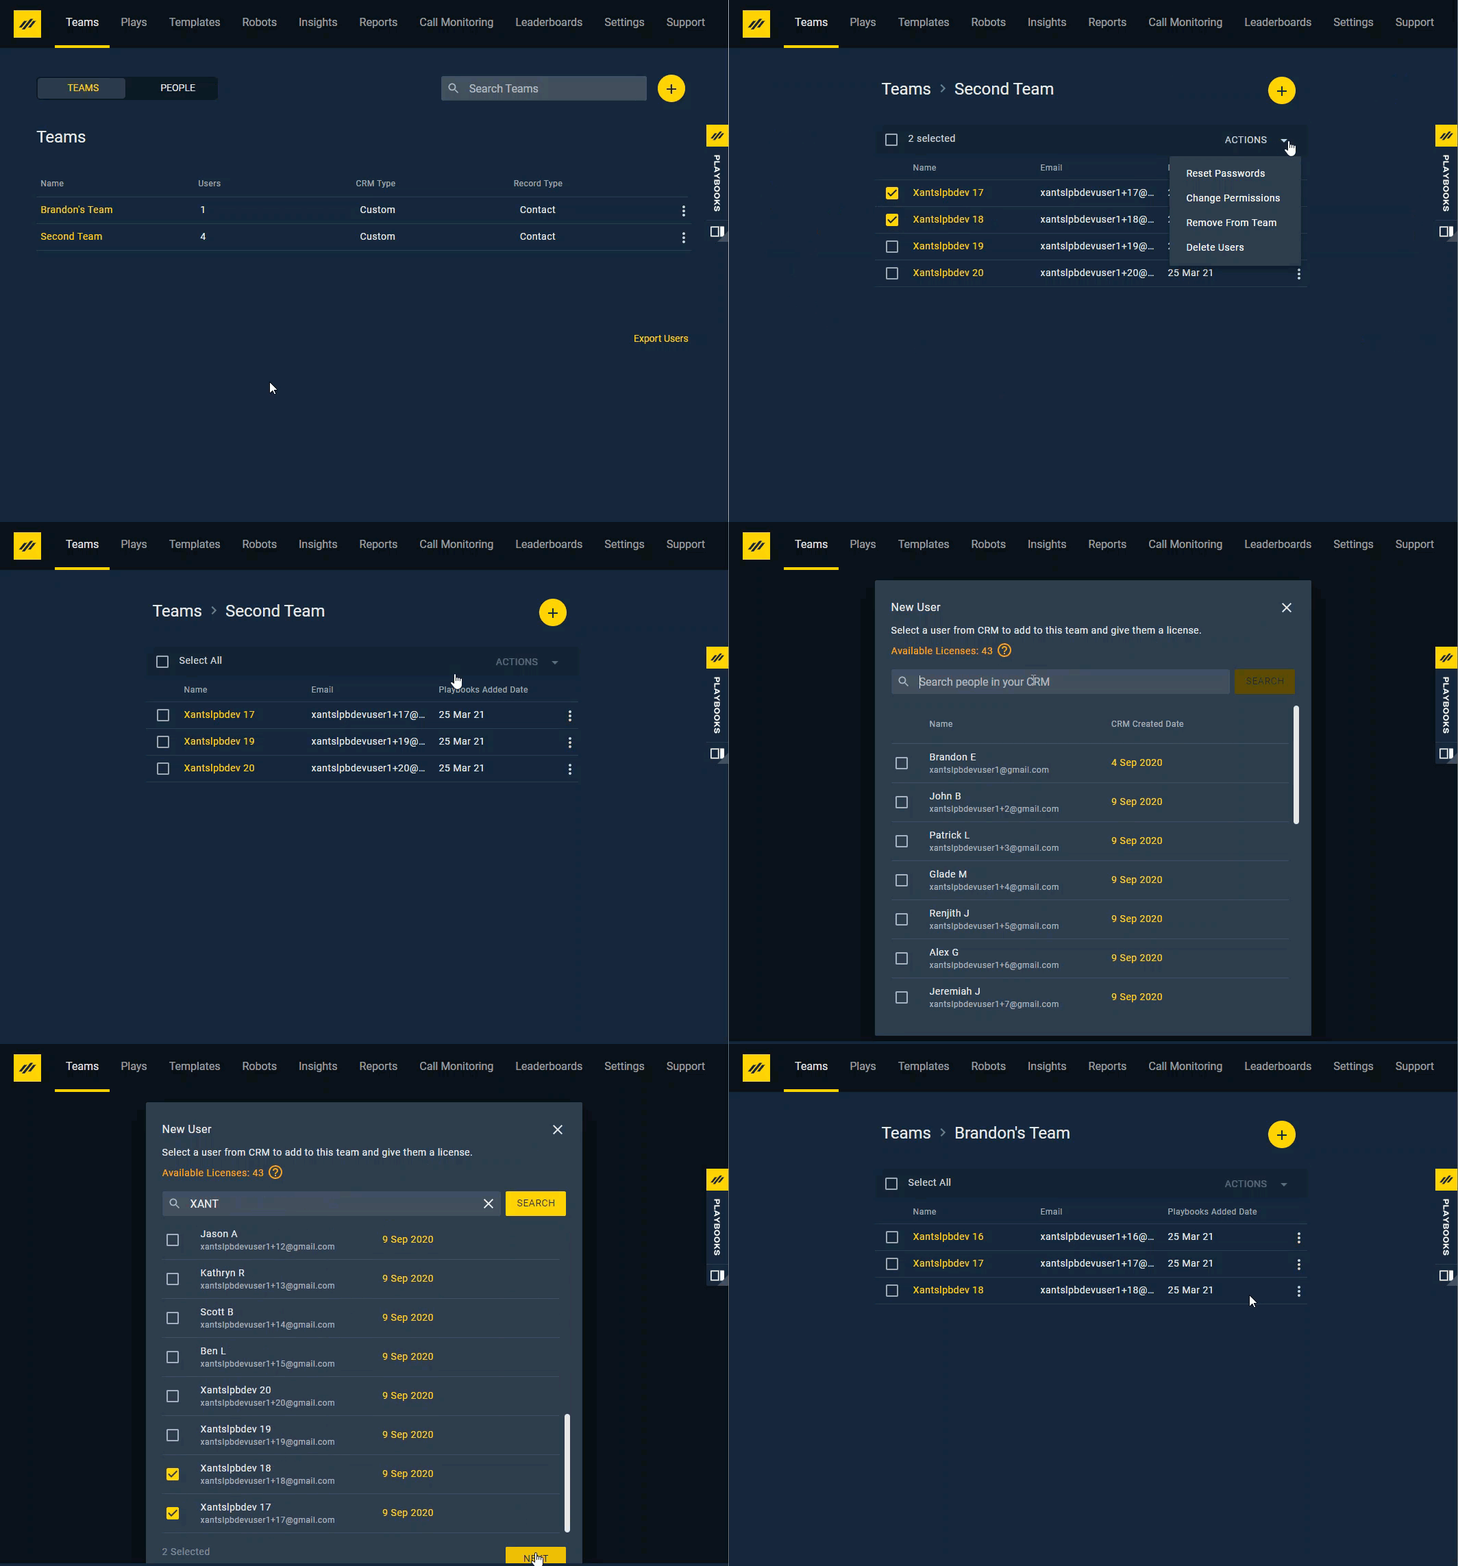
Certain settings can be edited for multiple users at once. You can reset passwords, change permissions, and change teams for groups of users to save time. It’s also possible to delete multiple users at once, but this process is covered in another section since there is more considerations when deleting users from Playbooks.
To Mass Edit Users from Team Page
- Open the Playbooks Manager Application.
- Click the Teams tab.
- Click a Team name.
- Click the box to the left of users’ names.
- Click ACTIONs drop-down menu.
- Select one of the following options:
Reset Password
Change Permissions
Remove from Team - Click CONTINUE.
Deleting Users
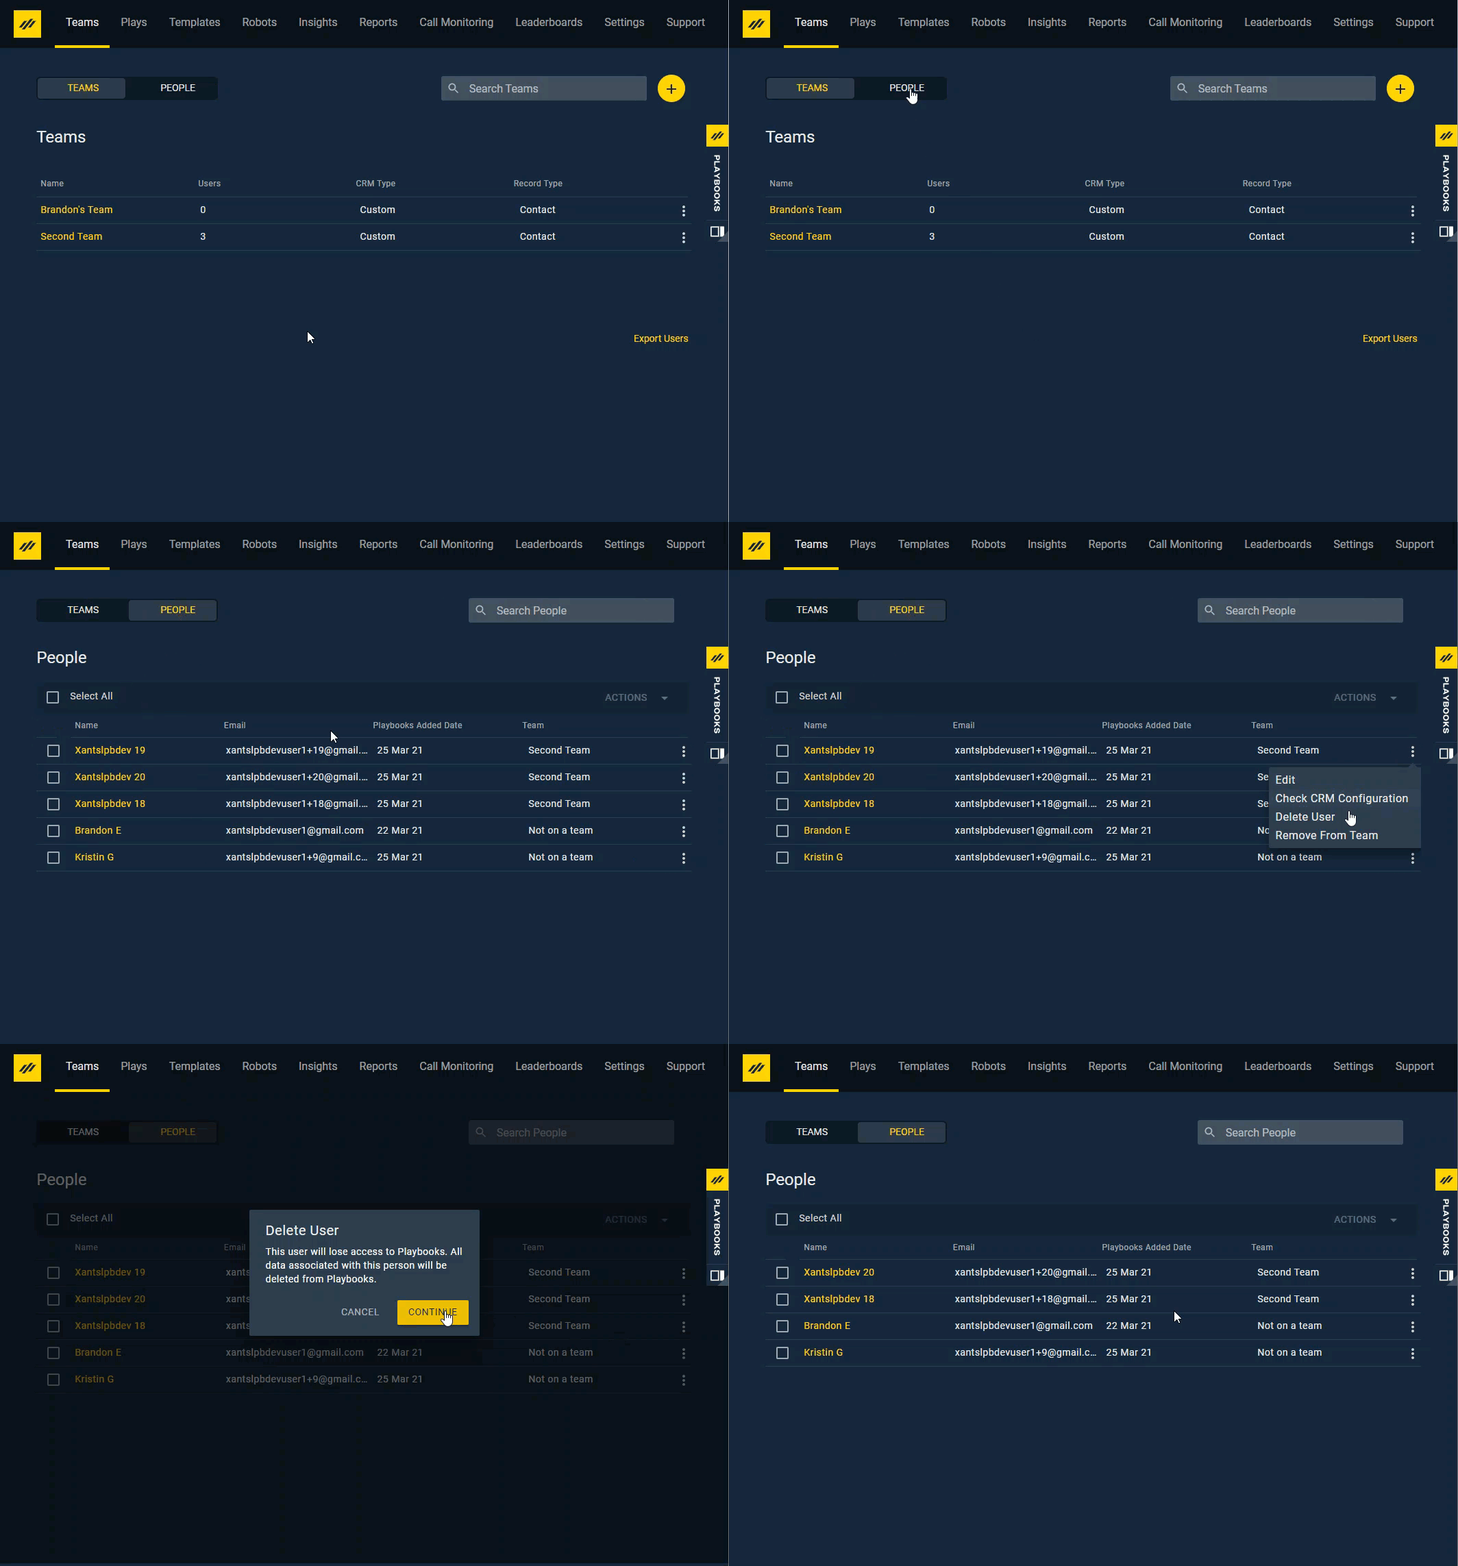
Deleting a user removes them entirely from Playbooks. Be aware deleting a user removes any data the user has from Playbooks, but will not delete or change any Plays this user has created. Tags created by the user will also remain after the user has been deleted. Before you delete a user, make sure you remove any tags they have applied to Plays and email templates. If the user is deleted and the tags have not been removed or shared with anyone, you may not be able to remove the tags after the user has been deleted.
To Delete a User from Teams Page
- Open the Playbooks Manager Application.
- Click the Teams tab.
- Click a Team name.
- Click the vertical ellipsis to the right of the agent’s name.
- Click Delete User.
- Click CONTINUE.
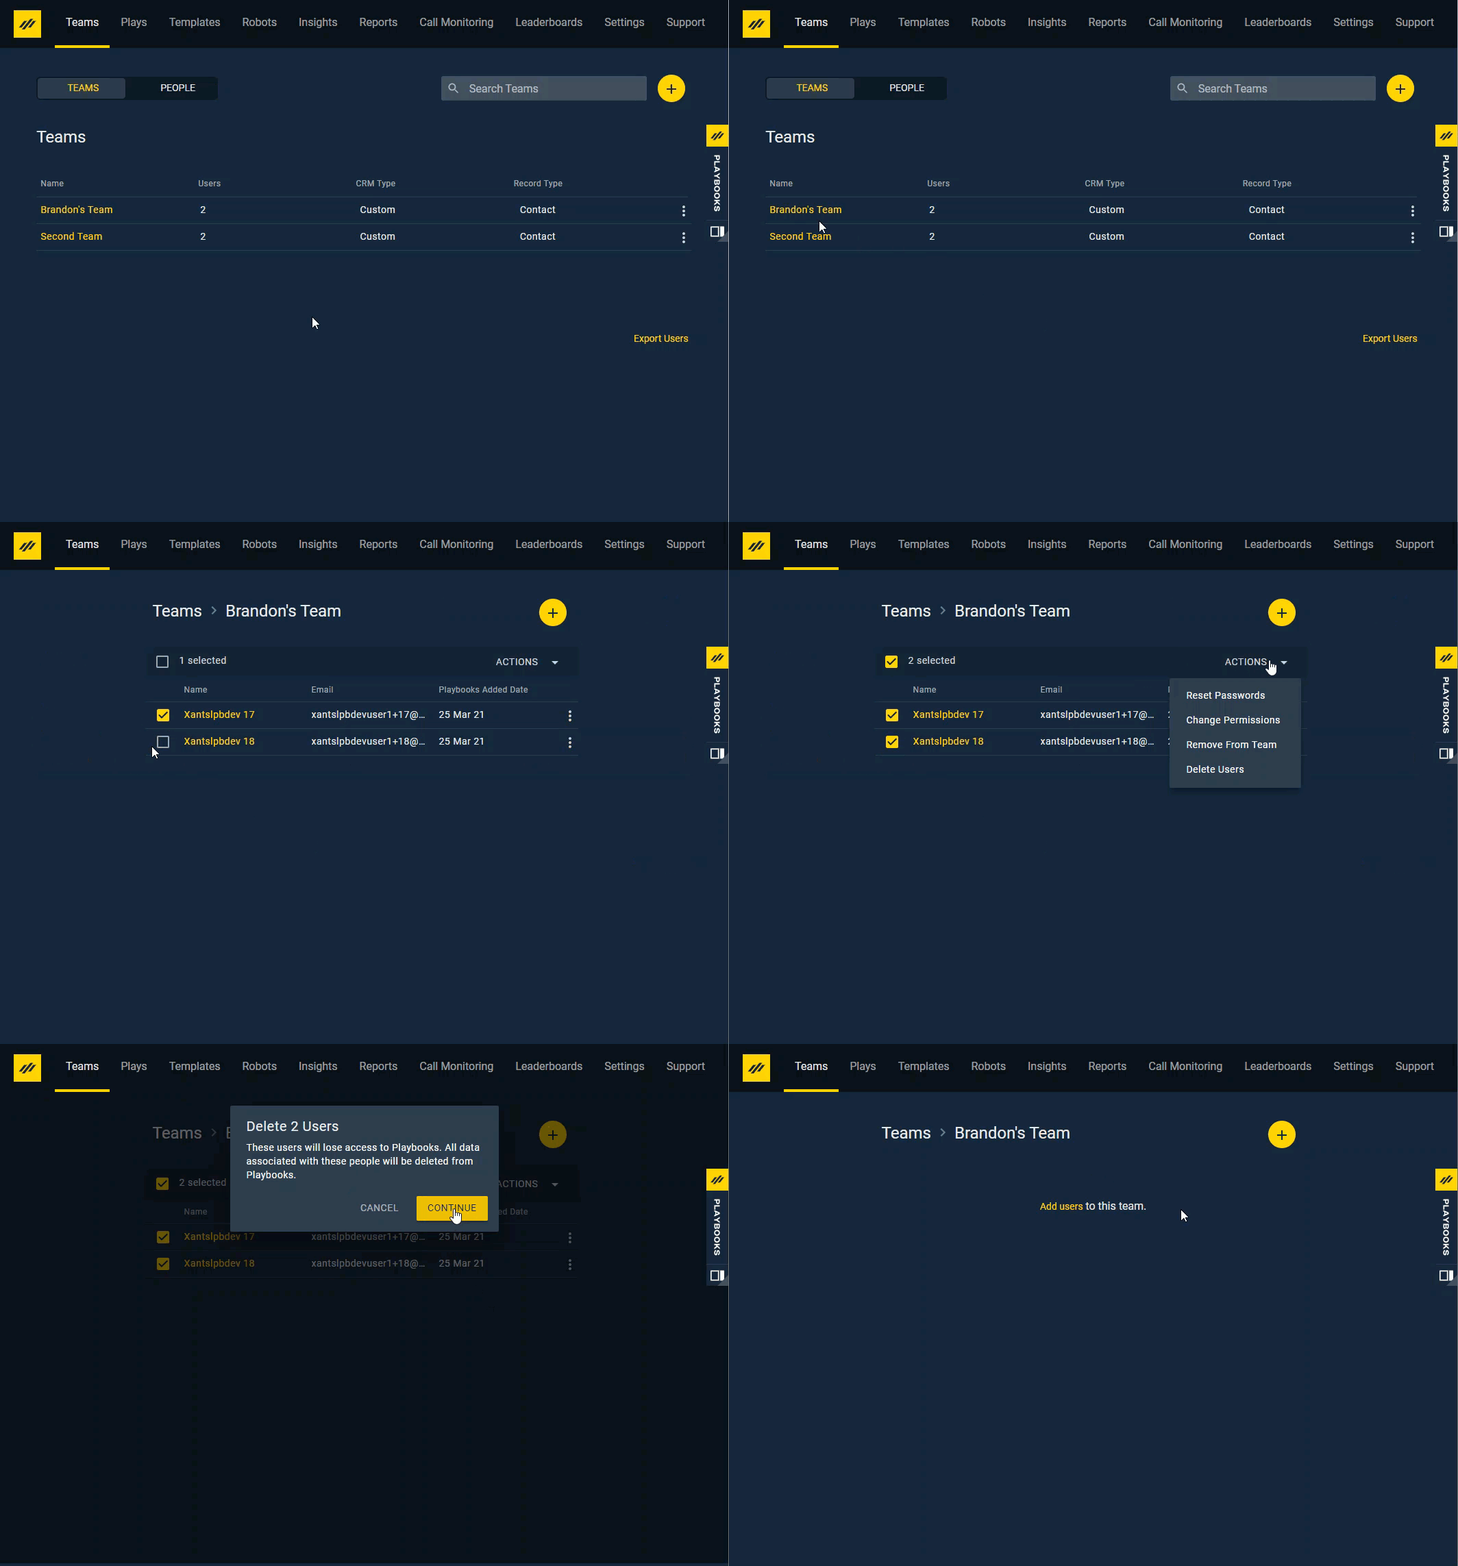
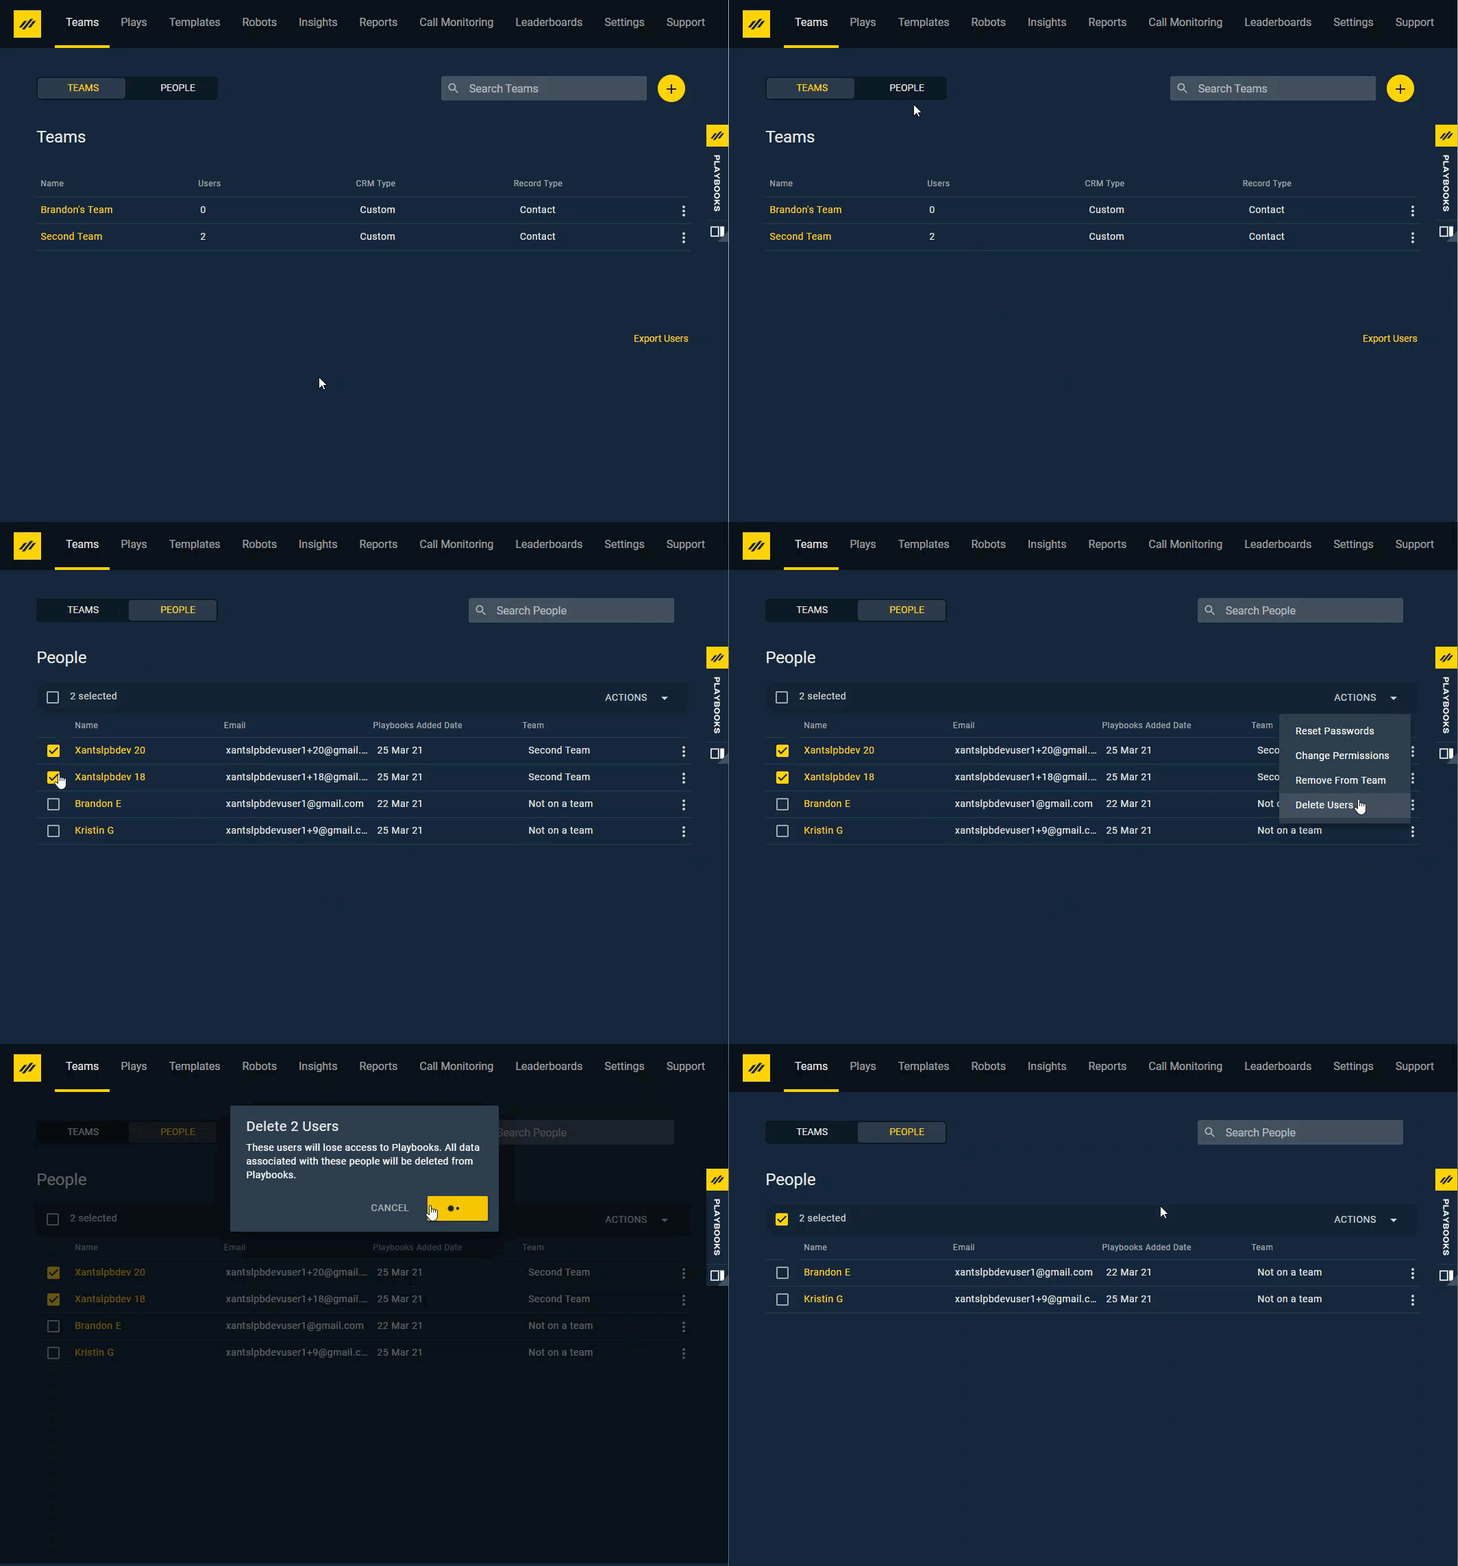
You can delete multiple users at once.
To Delete Users from Team Page
- Open the Playbooks Manager Application.
- Click the Teams tab.
- Click a Team name.
- Click the box to the left of users’ names.
- Click ACTIONs drop-down menu.
- Select Delete Users.
- Click CONTINUE.
Moving a User from One Team to Another
When there are changes in your organization, you can easily move agents from one team to another. A combination of removing the user from their current team and adding them to a new one is required.
To Move a User to a New Team
- Open the Playbooks Manager Application.
- Click the Teams tab.
- Click the user’s old Team name.
- Click the vertical ellipsis to the right of the agent’s name.
- Click Remove From Team.
- Click CONTINUE.
- Click the Teams tab.
- Click the user’s new Team name.
- Click the yellow plus button.
- Type the appropriate search terms for the user you want to add.
- Click SEARCH.
- Check the box next to the user that you would like to add.
- Click NEXT.
- Select a Permission Group for the user.
- Click NEXT.
- Select the License Type for the user.
NOTE: This will not add another license to this user if this user has already been using a Playbooks license. - Click SAVE.
To Mass Move Users to a New Team
- Open the Playbooks Manager Application.
- Click the Teams tab.
- Click the users’ old Team name.
- Click the box to the left of users’ names.
- Click ACTIONs drop-down menu.
- Click Remove From Team.
- Click CONTINUE.
- Click the Teams tab.
- Click the users’ new Team name.
- Click the yellow plus button.
- Type the appropriate search terms for the users you want to add.
- Click SEARCH.
- Check the box next to the users that you would like to add.
- Click NEXT.
- Select a Permission Group for the users.
- Click NEXT.
- Select the License Type for the users.
NOTE: This will not add another license to the users if these users have already been using a Playbooks license. - Click SAVE.

