Account and Opportunity Management
How to use Accounts and Opportunities with Playbooks
Accounts and Opportunities function in Playbooks similarly to Contacts and Leads with some nuances to manage multiple contacts being involved. Users enroll Accounts and Opportunities into Plays and complete Play Steps just as they would for a Contact or Lead, but Accounts and Opportunities may require a couple more clicks before the user can contact a potential customer. Working with Accounts and Opportunities often means some consideration before reps send an email or place a dial; however, Playbooks still streamlines the process and addresses most Account and Opportunity engagement use cases.
Adding Accts and Opps to Playbooks
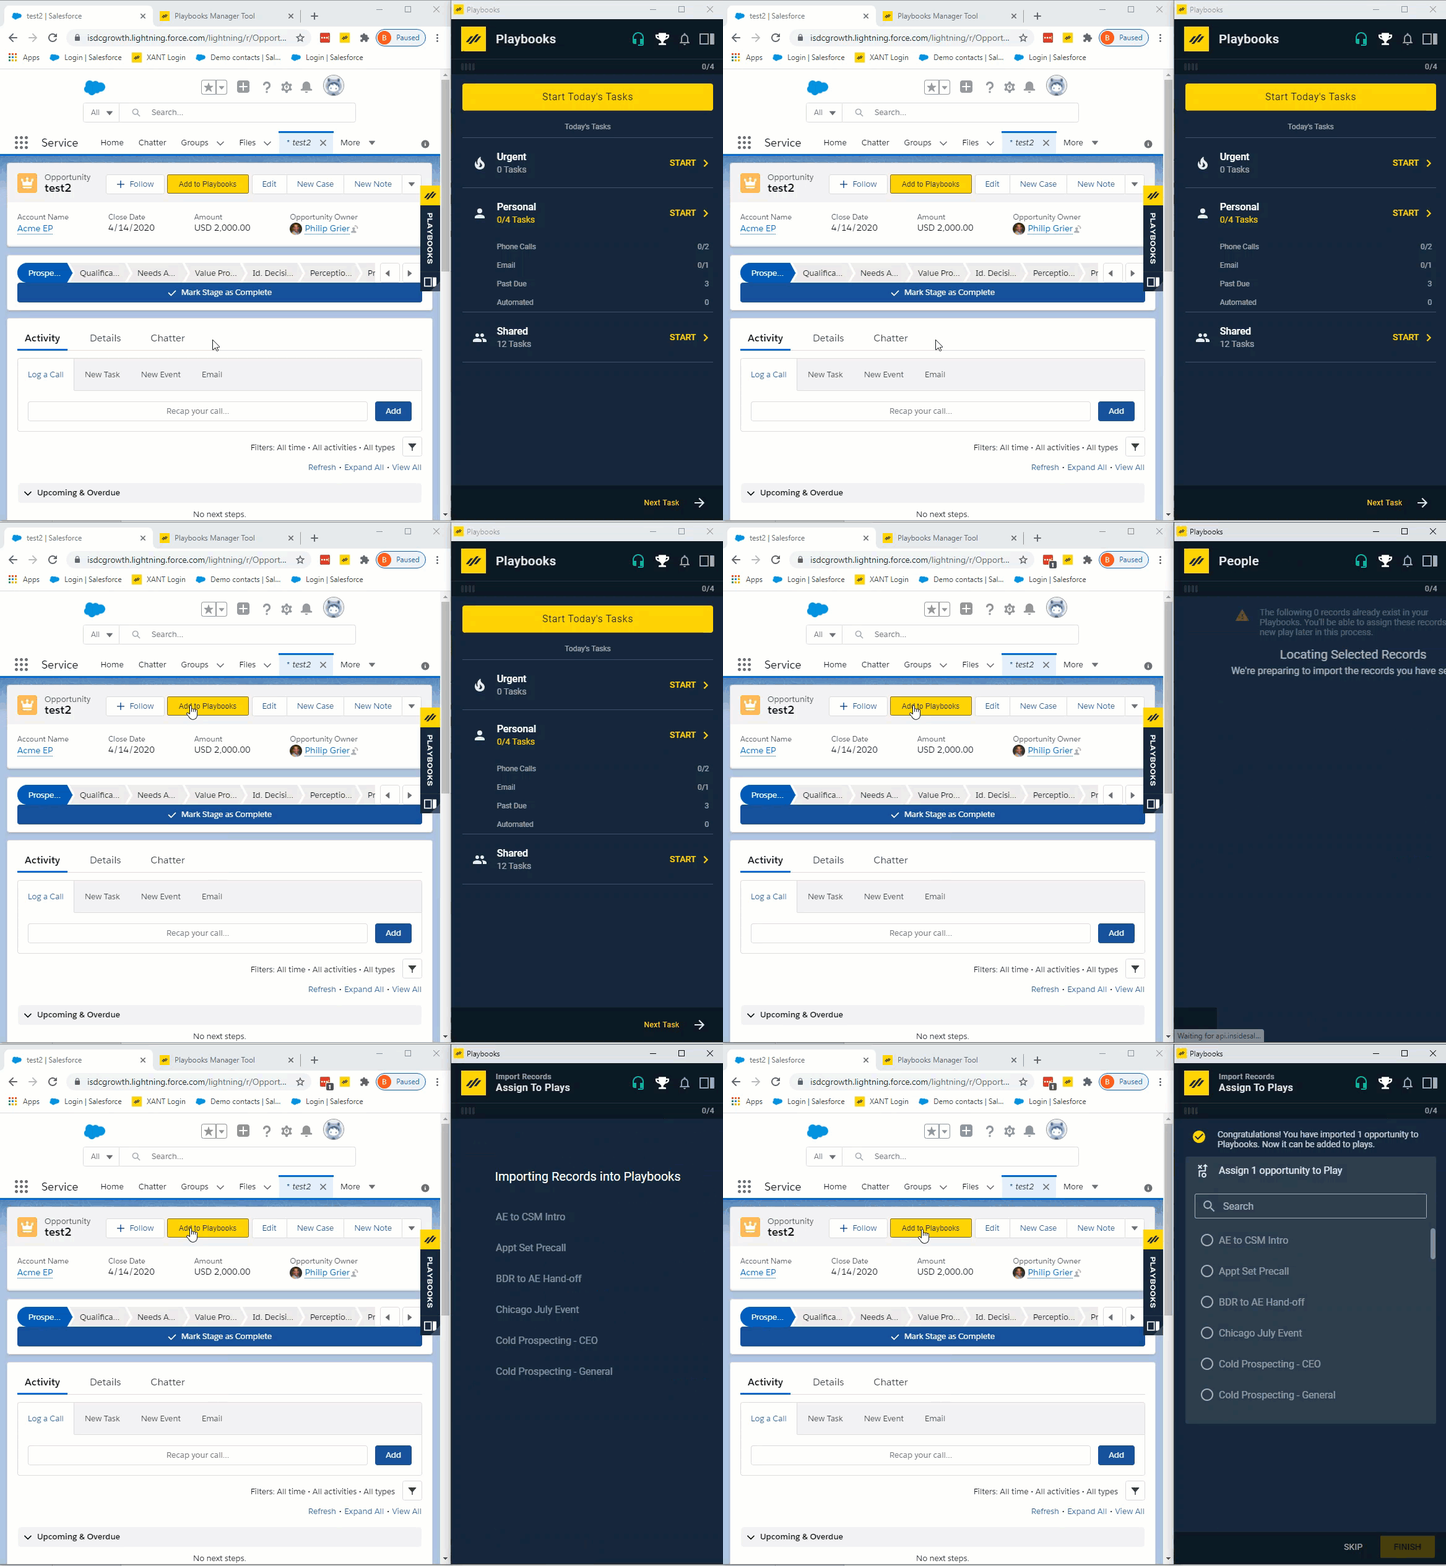
Users add Accounts to Playbooks the same way single Contacts and Leads are added. They can either be added one at a time or in groups using the Add to Playbooks button. Robots can also be used to enroll Account records into Playbooks. Opportunities, however, require some preparation in CRM before they should be added to Playbooks. The Contact Roles for the Opportunity must be established first before adding the Opportunity to Playbooks. If no Contact Roles have been established, the Opportunity will be empty when it is added to Playbooks and, therefore, have no Contact Roles to work with.
When an Account or Opportunity is enrolled in Playbooks, Playbooks brings in the 25 most recently modified Contact Roles based on the Last Modified Date which will be updated for any new activity or record change. There can be more contacts associated with the Account or Opportunity, but Playbooks caps the number of automatically added Contact Roles to keep Playbook from becoming bogged down with irrelevant contacts.
Additional contacts can be added to Playbooks and related to an Account or Opportunity, but there could be some additional steps to do this. If a rep enrolls a Contact Role from the Contact record, Playbooks assumes there is a relationship between the Contact Role and the Opportunity if the Opportunity is open and that rep is the Opportunity owner. Playbooks then relates all the calls and emails from that Contact to the Opportunity. If the rep isn’t the Opportunity owner or the Opportunity isn’t open, the contact could be added as a standalone contact and the Contact’s Playbooks activity history won’t show up on the Account or Opportunity Playbooks page. Follow the steps below to relate a Contact to an Account or Opportunity.
To Link a Contact to an Account or Opportunity in Playbooks
- Add the contact to Playbooks.
- Add them to the same Play the Account or Opportunity is enrolled in.
- Navigate back to the Account or Opportunity action screen.
- Click the vertical ellipses to the right of the Account or Opportunity name.
- Select Sync.
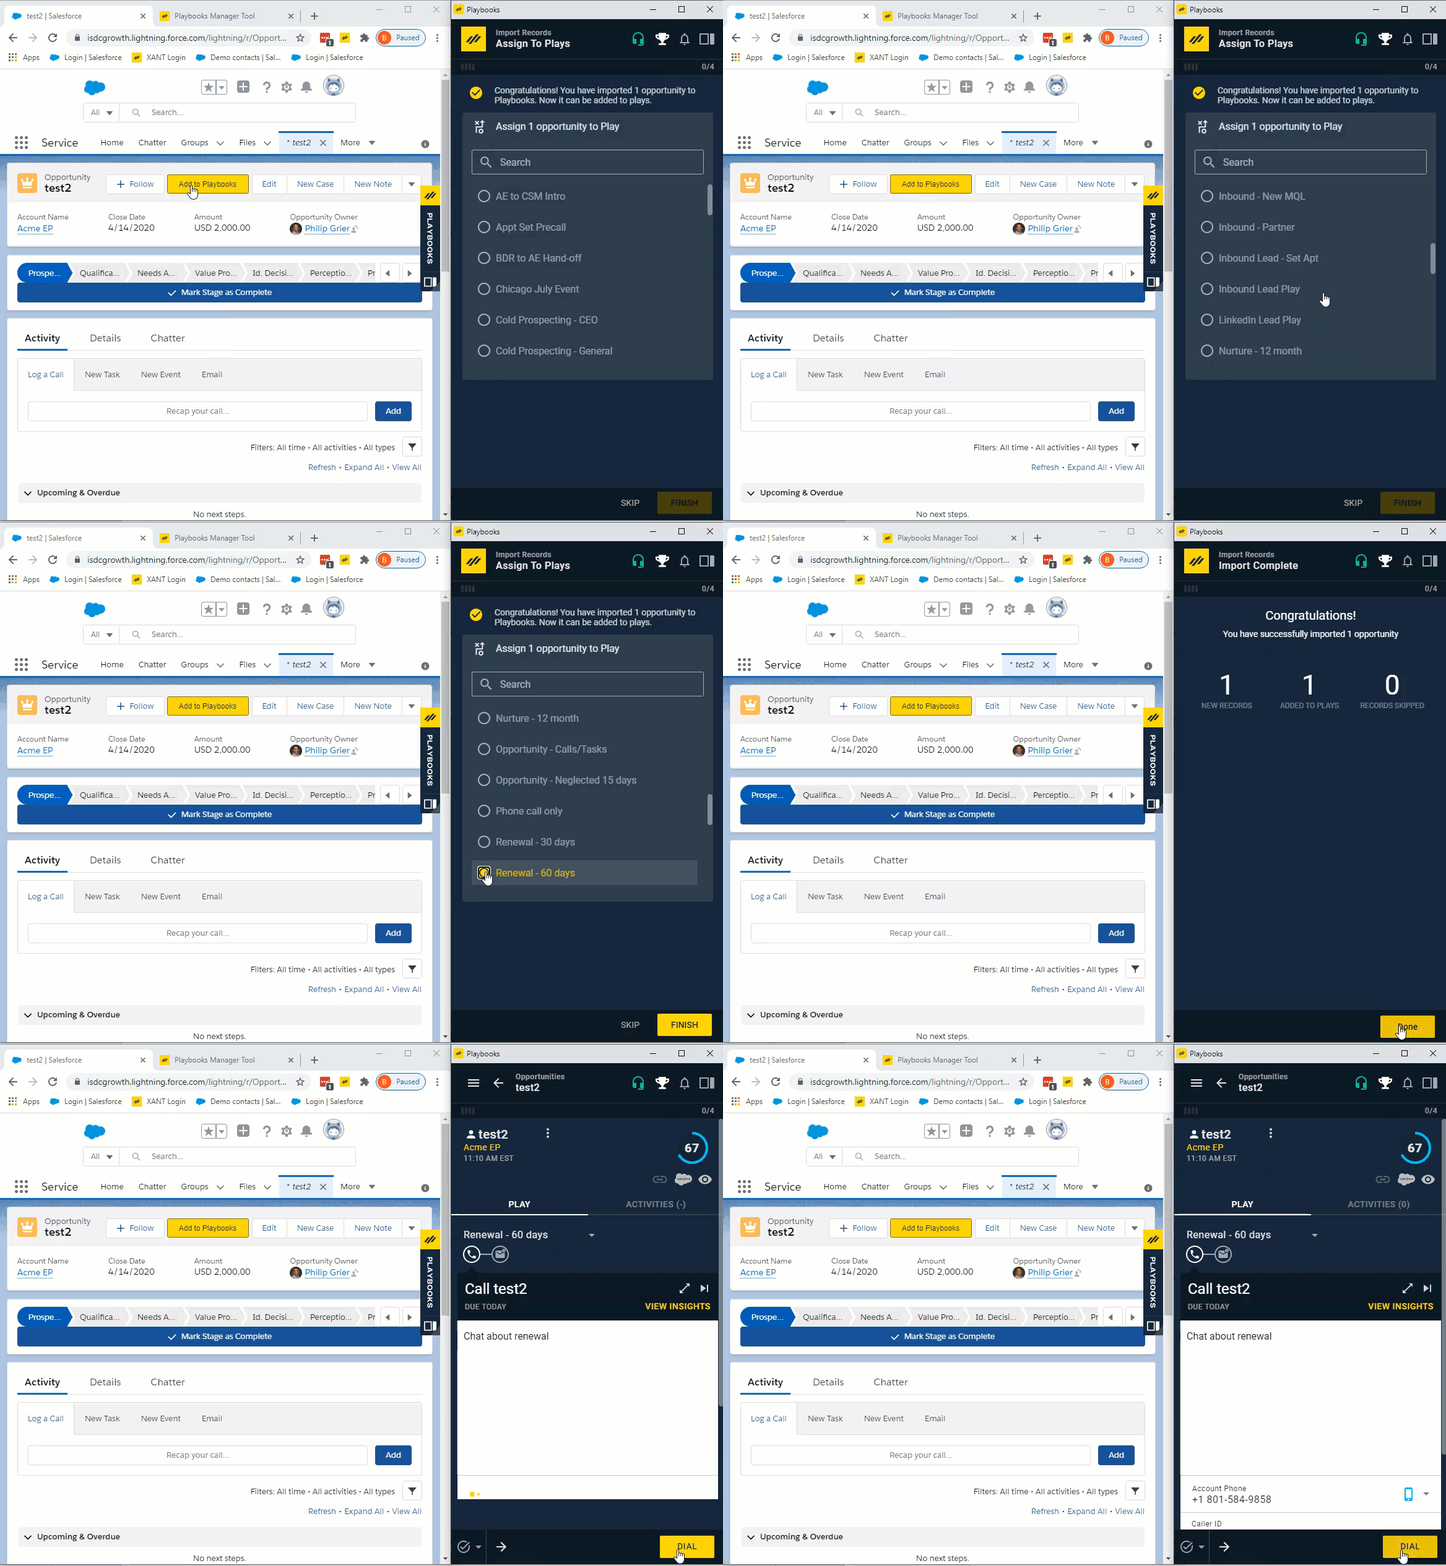
Enrolling Accts and Opps in Plays
Enrolling Account and Opportunity records into a Play is the same a enrolling Contact and Lead records. The decision of who to contact happens when a task is presented (see Completing Tasks section below).
Completing Tasks for Accts and Opps
Accounts and Opportunities that are enrolled in Plays will have Play Steps due just like any other record in Playbooks. When actioning a non-person record, the user must select who they are calling or emailing before completing the step.
It is possible to use the phone number or email fields on the CRM record if one has been provided. However, those numbers and addresses can be tricky since the rep might not know who will be picking up or who checks the email. If there isn’t a Primary email address, Playbooks pulls the related contact’s phone numbers and email addresses alphabetically based on the contact’s names. Each time a new Play Step is presented, users will have the option to select which contact they wish to engage with. The sections below walk through how emailing and calling works with Accounts and Opportunities.
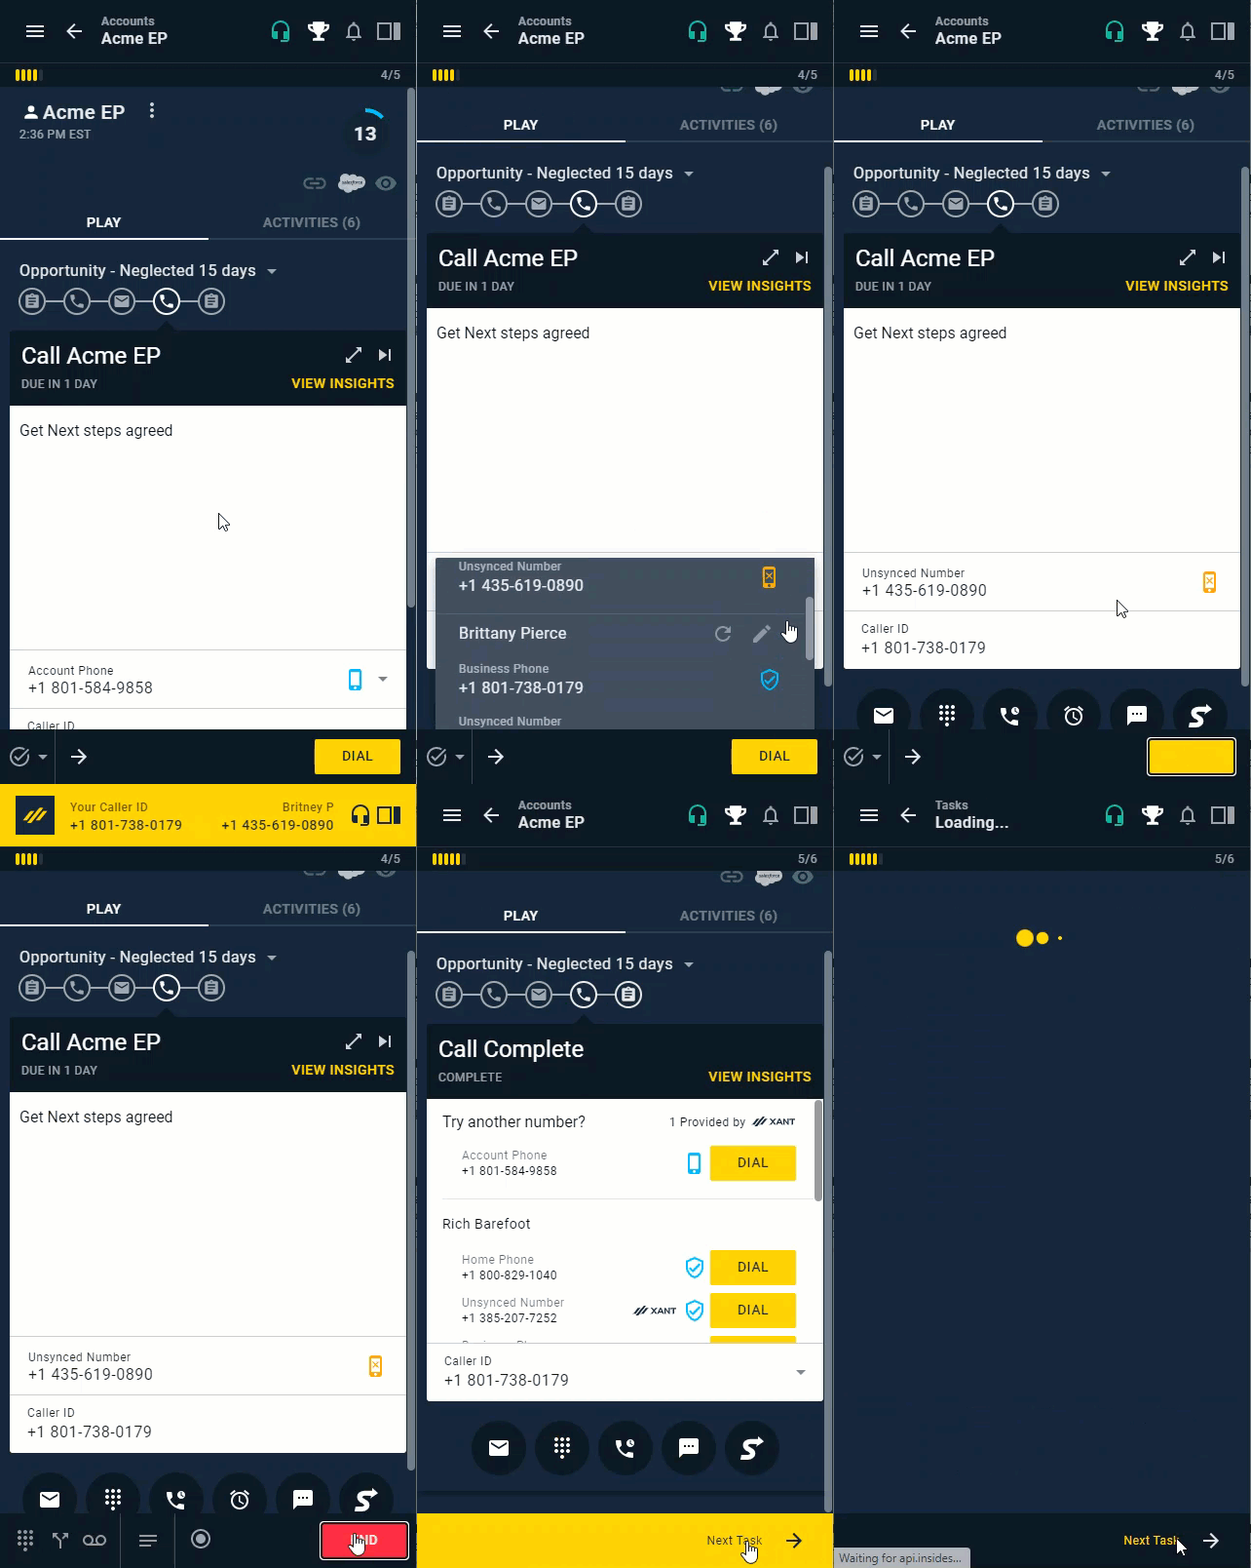
When presented a call task, reps choose which Contact Role and related phone number to call. Before dialing, reps should consider who is the best contact to call, and what happens if they don’t pick up? Should they try another number or move on to the next Play Step? If reps want to call another person, they can place another call with the Try Another Number feature or place an ad hoc phone call.
Before placing a call, take a moment to consider what time it is for the contact. Playbooks assigns the time zone for Accounts and Opportunities based of the phone number assigned to that object. If there is no primary number found, Playbooks will set the time zone based on the most commonly found time zone across all contacts tied to that Account or Opportunity. If the time zone selected for the Account or Opportunity is incorrect, reps can set the proper time zone when they edit the Account or Opportunity record (see Edit Acct and Opp section below).
To Complete a Phone Call Task
- Open a phone call step.
- Select the preferred contact and phone number in the first drop-down menu.
NOTE: You will only be able to select phone numbers that are listed on the Account or Opportunity record or related to a listed Contact Role. - Optionally, select how your Agent number will appear to the customer in the second drop-down menu.
- Click DIAL.
- Complete the call.
- Click END.
- Select a Call Result
- Optionally, add a subject.
- Optionally, complete additional disposition fields.
- Click SAVE.
- Click Next Task.
-OR-
Place a call with Try Another Number.
NOTE: This call will count as a sub-step to the initial call.
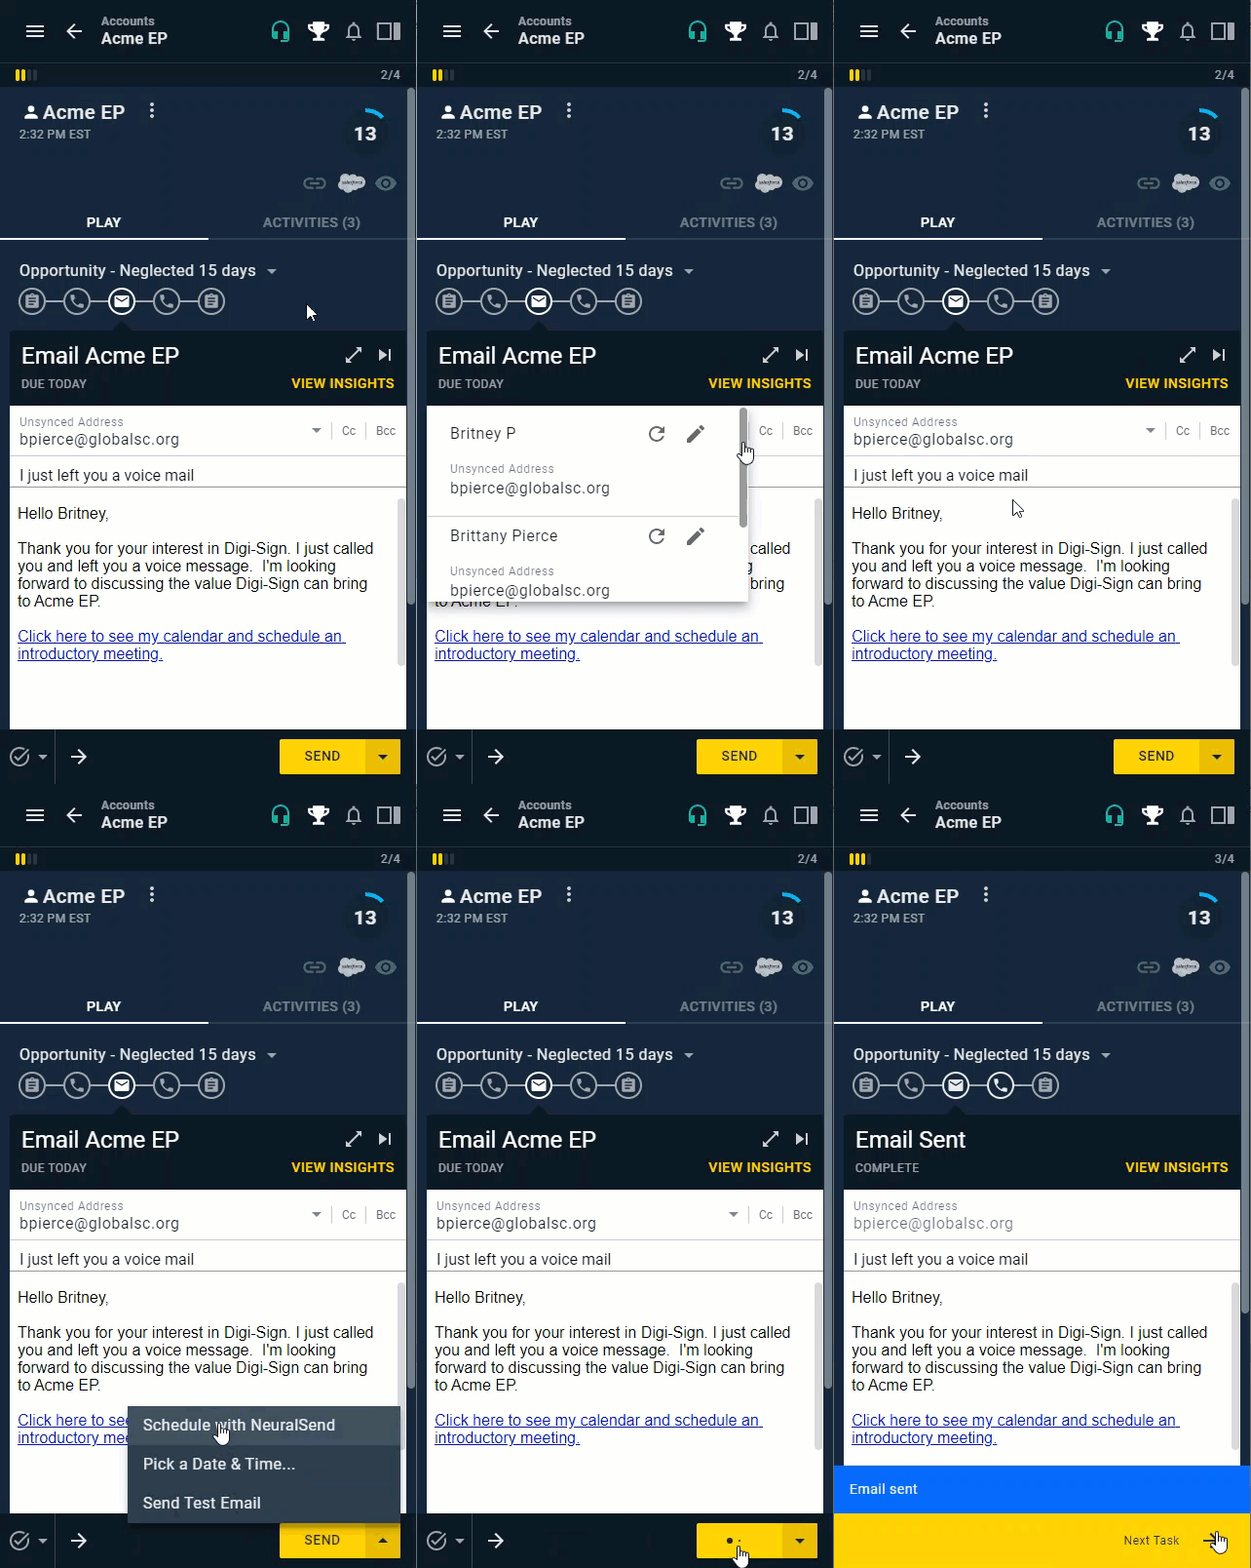
When presented an email task, reps choose which Contact Role and related email address to use. Use Merge Fields to personalize email templates. Merge Fields pull the Contact Role name into the template as long as they are related to the Opportunity in Playbooks. After selecting the proper contact and putting the finishing touches on the email, reps can choose to send it immediately, send utilizing SmartSend, schedule the email manually, or send a test email.
To Complete an Email Task
- Open an email step.
- Optionally, edit your message.
- Select the preferred contact and email in the To line.
- Click SEND.
-OR-
Choose a send option in the drop-down menu.
Other Acct and Opp Email Considerations
- An email Play Step can only send one email to one Contact Role at a time. Reps can add more people to an email by CCing them, but they can’t email all contacts at the same time from Playbooks. If users don’t want every Contact Role included on one email, they can send each contact an ad hoc email.
- Automatic Email Play Steps convert to a manual email steps when Accounts or Opportunities are enrolled in a Play. This happens because Accounts and Opportunities usually have multiple contacts associated with them and Playbooks won’t send an email without the rep approving which contact they want to send the email to.
- Track & Sync is helpful for keeping email replies in order. As with all emails, the initial response is easily synced because it’s sent directly from Playbooks. After that, if reps wish to send actual email replies to customer, it must be done through their Outlook or Gmail using Track & Sync.
- If for some reason an email is sent to a contact that isn’t linked to the Opportunity, reps can relate the email to the Opportunity after the fact from the CRM record.
At times, reps will be calling the correct Contact Role, but the timing is wrong for the prospect. Scheduling a call will add a unique Scheduled Call task to the Play flow. It does not permanently modify the Play the record is enrolled in, but it does adjust the remaining tasks of that Play for that record, pushing out future tasks. Just like with a call Play Step, reps will need to select which contact they are contacting before they press dial, but the rest of the steps to schedule a call are the same as scheduling a call for a single contact.
Sometimes the action reps want to take on an Account or Opportunity isn’t a Play Step. Even though these tasks are not part of a Play, they still sync to CRM. To make ad hoc tasks work seamlessly with the contact information in CRM, enable click-to-call and click-to-email.
Once tasks are complete, the activity is logged to the CRM Activity History and the Playbooks record Activity Feed. Use the data from these activities to track Play success and adoption. Playbooks recognizes Sub-steps, so reps get credit for all the work they complete in Play. Sub-steps are considered an in-Play activity if they are initiated within 10 minutes of the parent Play Step and are the same type of activity as the parent task. If a rep places a call from a Play Steps but there’s no answer, they can place a second call which will count as a Play Sub-Step, as long as they place the call within the 10-minute window. These Sub-steps will be listed under the parent Play step.
Editing Accts and Opps in Playbooks
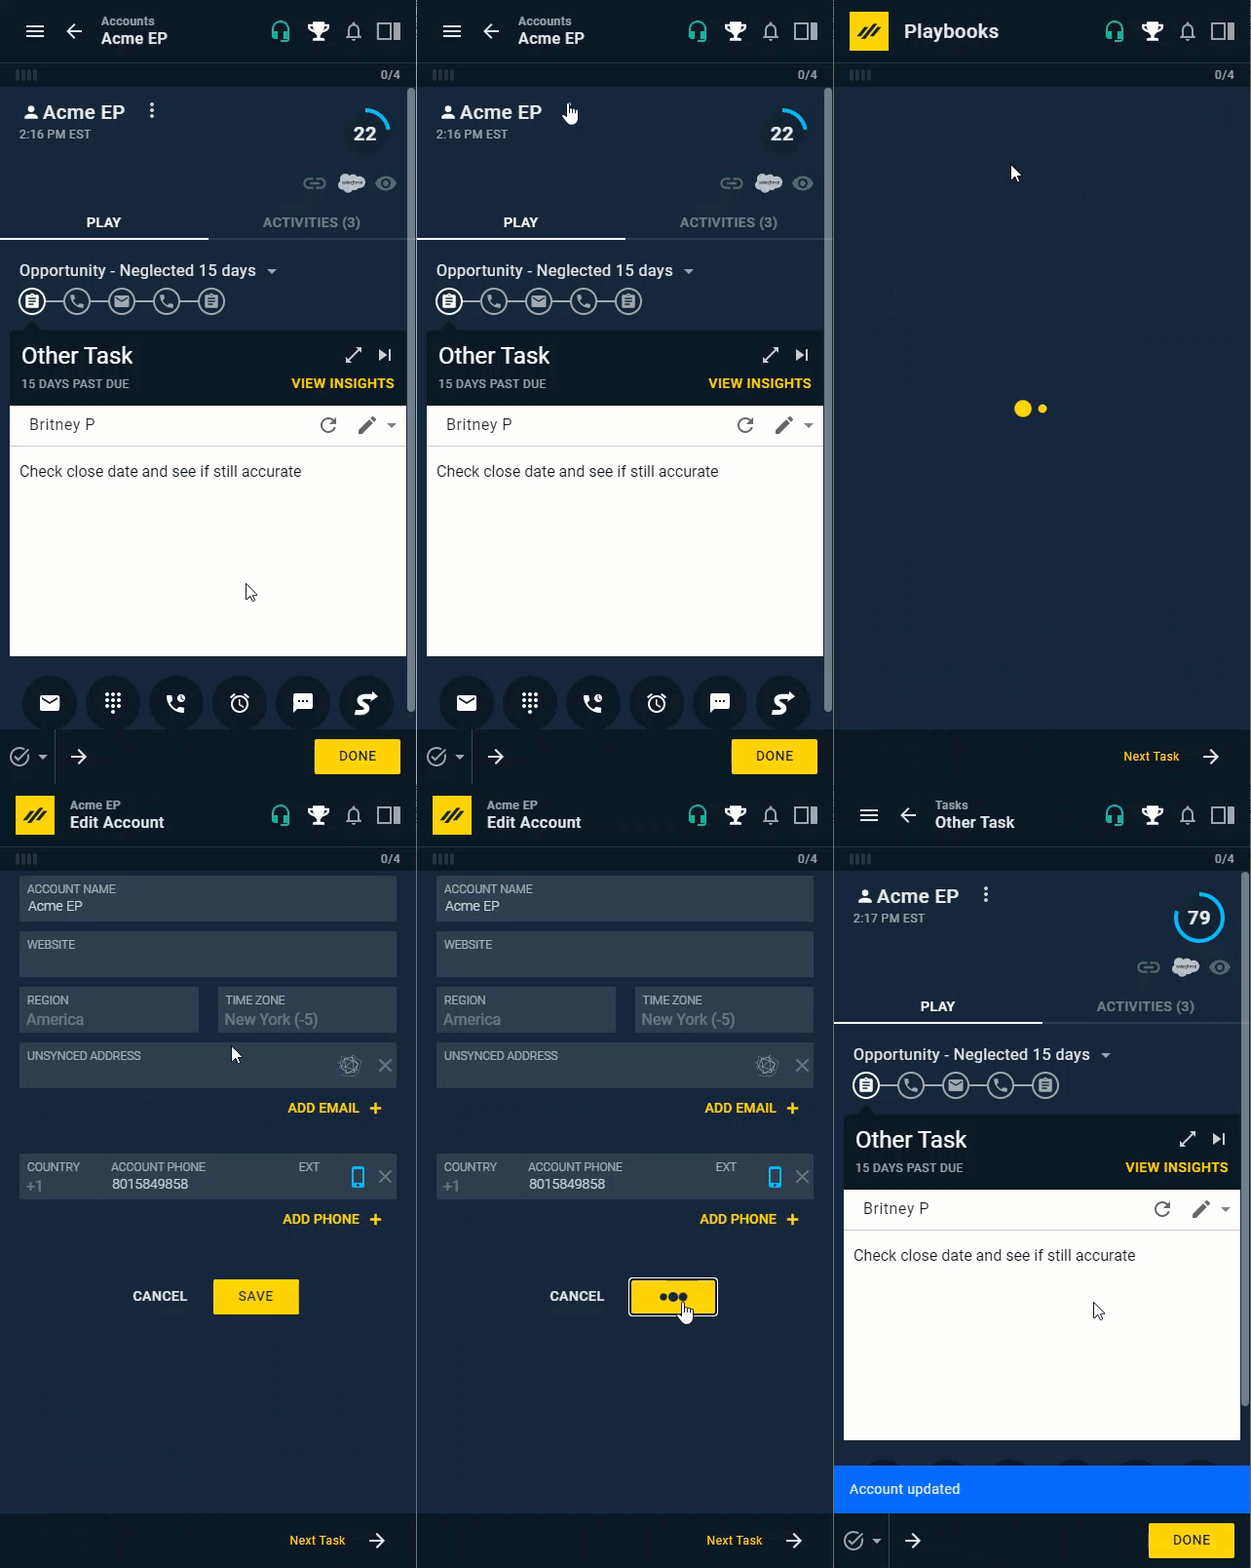
Reps can edit Accounts and Opportunities directly from the Account or Opportunity record in Playbooks. Once the information syncs with the CRM, the information will be updated there as well unless the user adds the information to an unsynced field. Editing this record only changes the information for the Account or Opportunity and doesn’t change any information for the individual Contact Roles.
Accounts and Opportunities can have contact information tied directly to their record. Any numbers on the Account or Opportunity record is considered a primary phone number or email. If there is a primary phone number or email included on the Account or Opportunity profile, Playbooks will default to this number or email during Play Steps.
To Edit an Account or Opportunity Record
- Open an existing Account or Opportunity.
- Click the vertical ellipses to the right of the Account or Opportunity name.
- Select Edit.
- Edit the desired fields.
- Click SAVE.
Reps can update Contact Roles by clicking the edit symbol next to the contact in any Play Step. After making changes to Contact Roles, reps must manually sync the record to ensure the information is pushed back to CRM. Syncing the record immediately ensures the changes to the record are pushed to the Account or Opportunity and not just the contact.
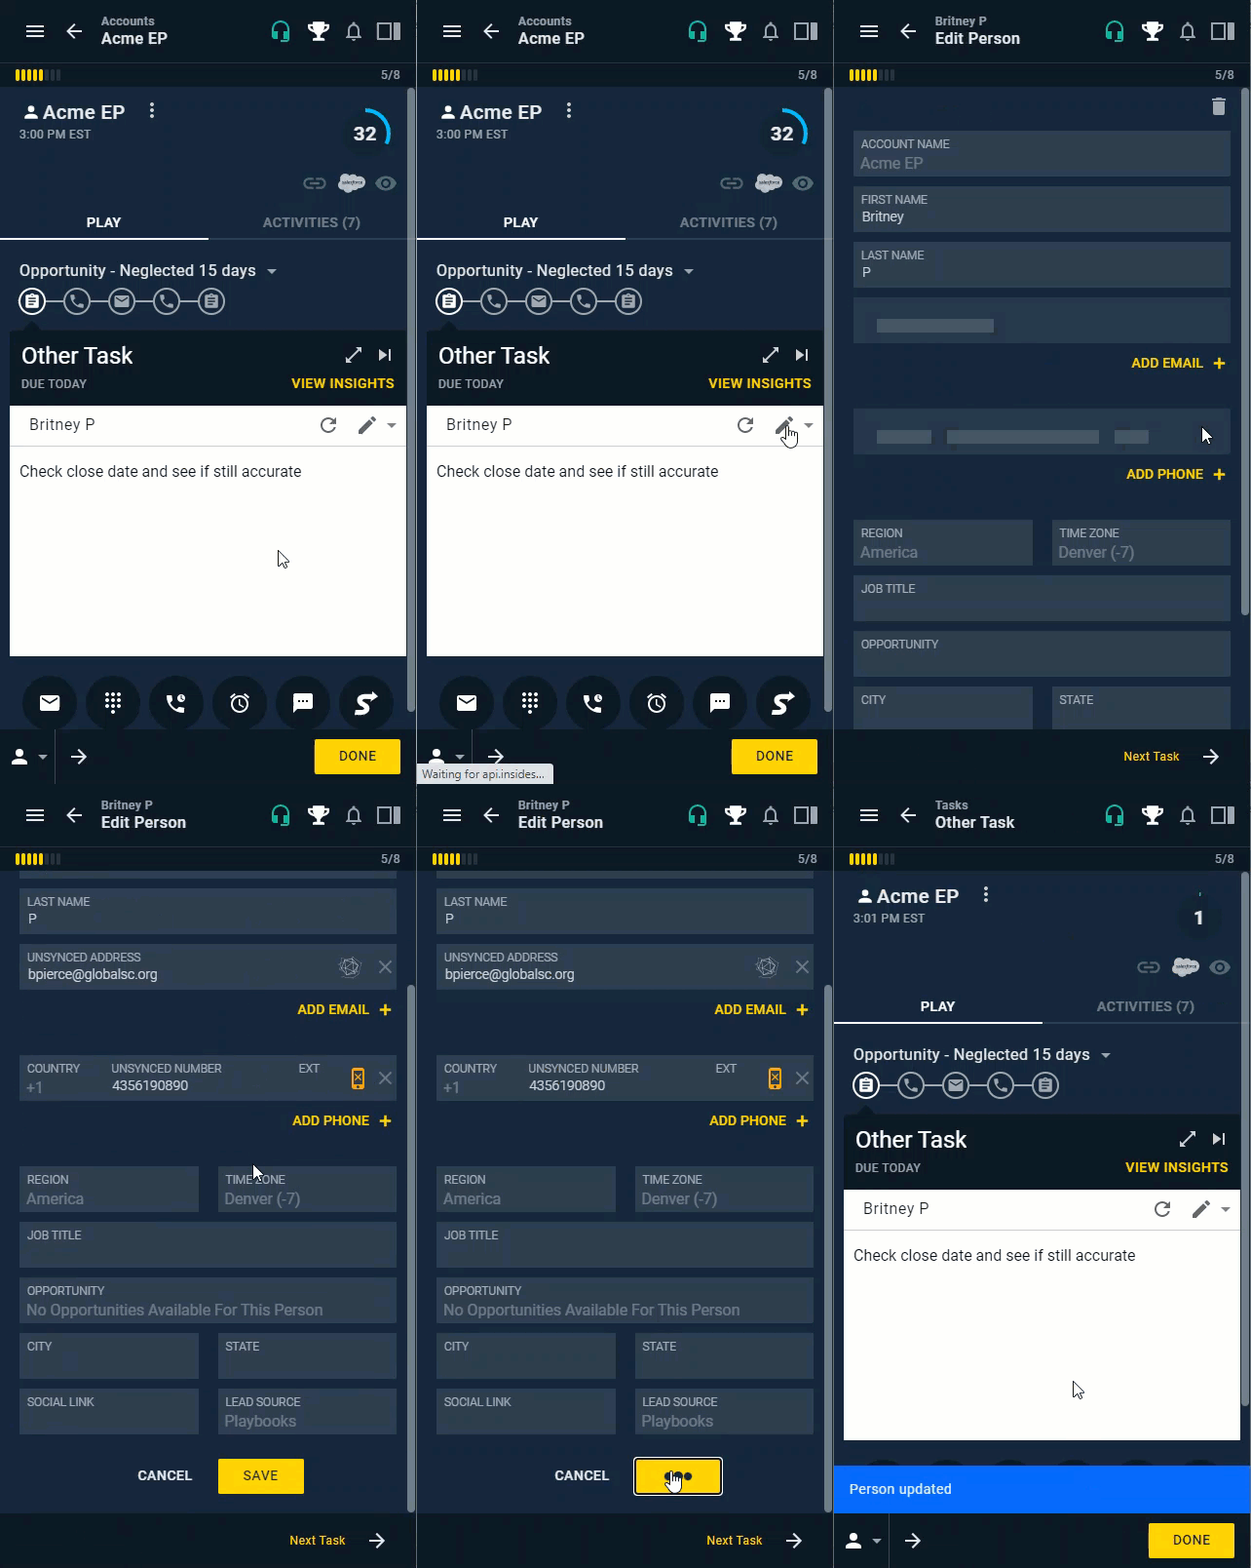
To Update a Contact Role Record
- Select the Contact Role you wish to edit from the list of options.
- Click Edit (pencil symbol).
- Edit the desired fields.
- Click SAVE.
- Navigate back to the Account or Opportunity action screen.
- Click the vertical ellipses to the right of the Account or Opportunity name.
- Select Sync.
Sorting, Filtering, and Searching for Accts and Opps
Find the Accounts and Opportunities faster and easier by sorting, filtering, or searching through all the records in Playbooks.
Sort Accounts and Opportunities to complete the day’s work in the most efficient way. Custom sorts that have been personalized for the user’s team will appear at the top of this list. Standard sorts appear below the line. If priority scoring models have been created, reps will also have access to Priority Score, Contactability, and Task Value sorts. Sort selections are remembered until they are changed.
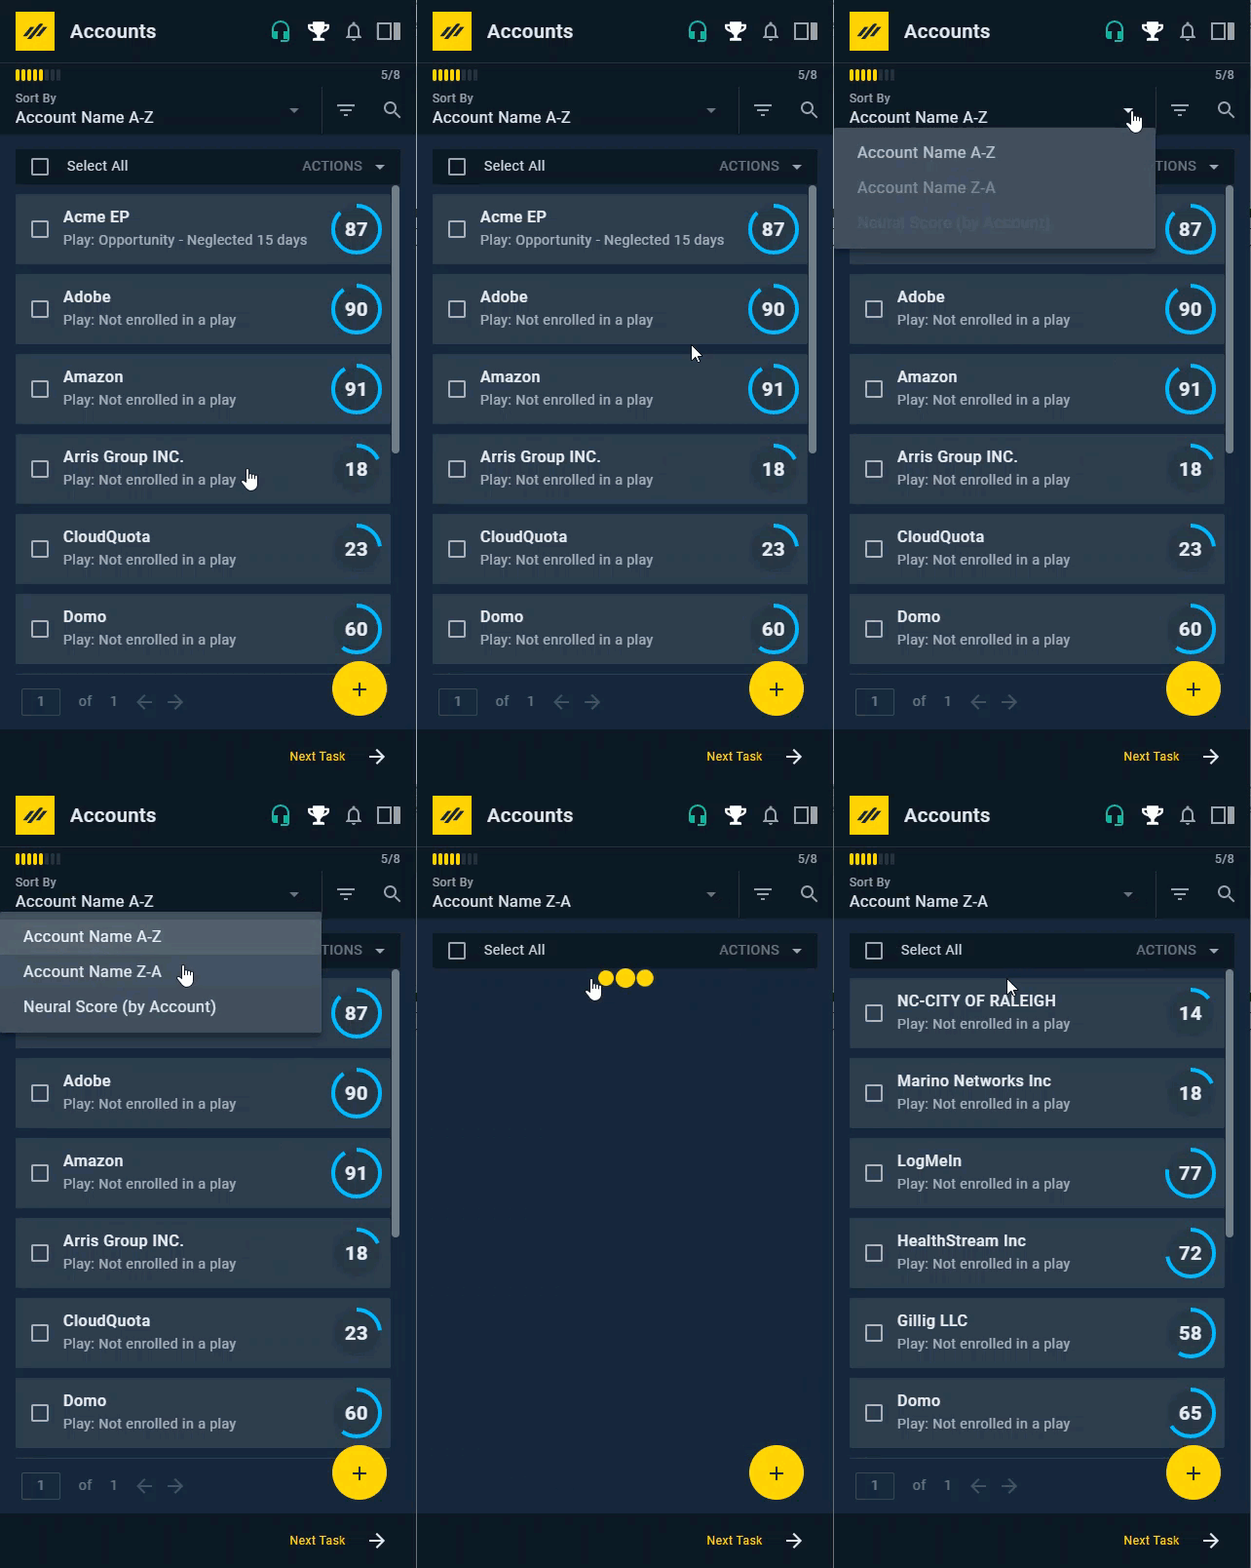
To Sort Accounts or Opportunities
- Open Playbooks.
- Click the menu button (XANT logo).
- Click Accounts or Opportunities.
- Select an option from the Sort By drop-down.
- Click the Next Bar to start working tasks in the order displayed.
Playbooks calculates a Priority Score which describes 1) how likely you are to get in contact with a prospect and 2) how likely you are to close deals pitched to the specific prospect. Click this message to learn more about the Playbooks Priority Score and other Buyer Intelligence Features.
Reps can filter Accounts and Opportunities to work from a subset of the most important activities. Filter options include All Accounts or Opportunities, those enrolled in Plays, those not enrolled in Plays, or Paused.
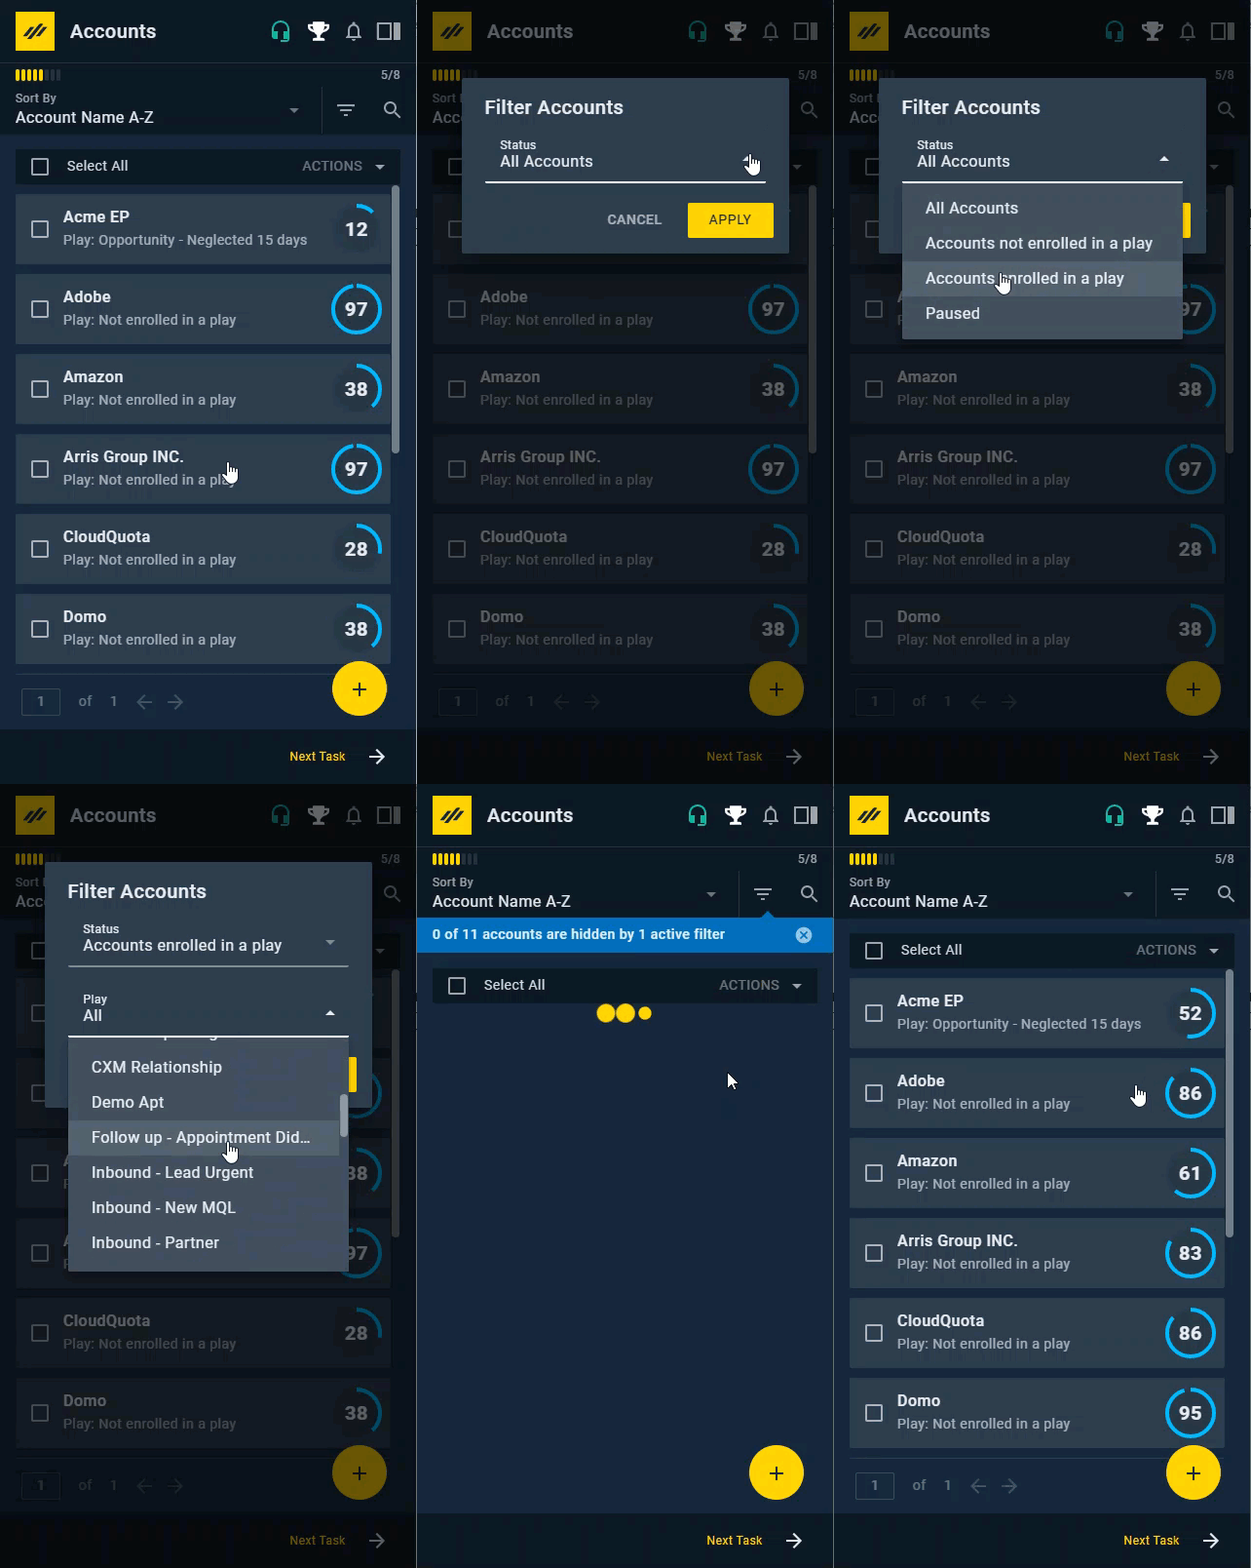
To Filter Accounts and Opportunities
- Open Playbooks.
- Click the menu button (XANT logo).
- Click Accounts or Opportunities.
- Click the Filter
- Select desired filter criteria.
- Click APPLY.
Playbooks allows reps to find Accounts and Opportunities based on relevant search terms. Phone numbers and email addresses are not relevant search terms.
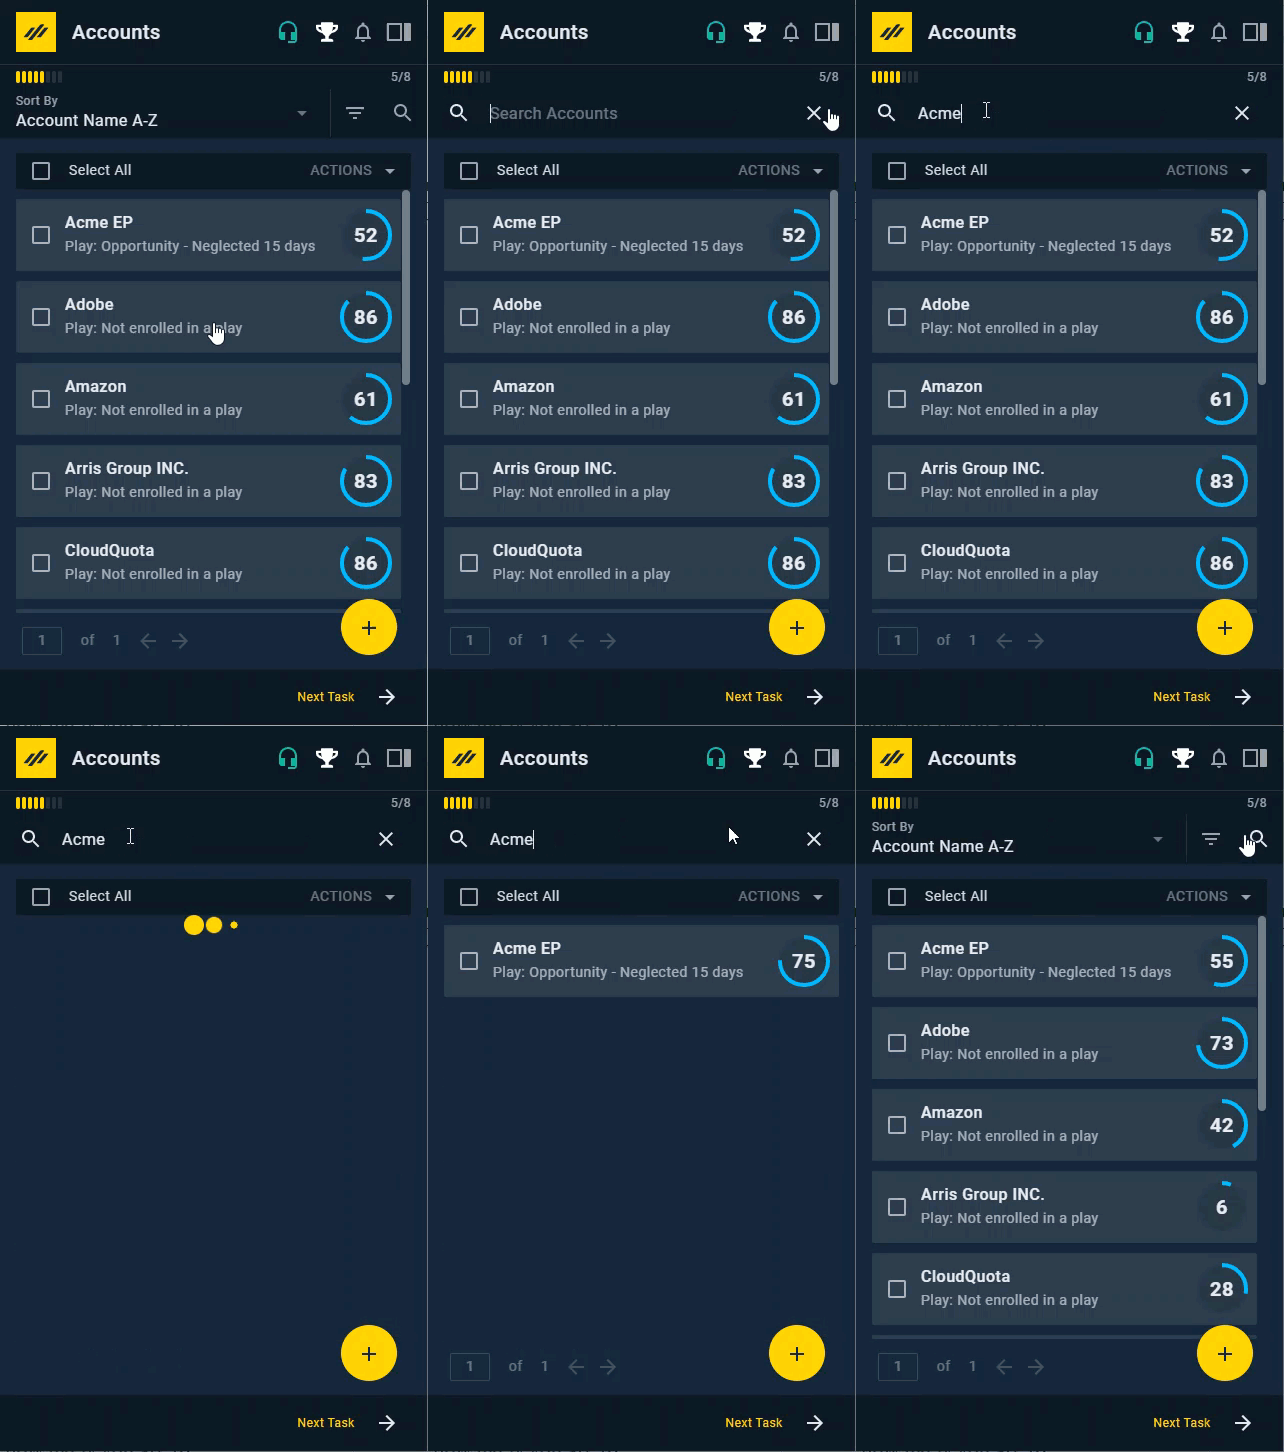
To Search for an Account and Opportunity
- Open Playbooks.
- Click the menu button (XANT logo).
- Click Accounts or Opportunities.
- Click the magnifying glass.
- Input search term.

